IoTize Studio
Installation procedure
Download from this address (http://www.iotize.com/download.html)(takes about 2 mins).
Run the .exe, accepting all requests:
- Double-click on the IoTizeStudio_nnnn (nnn = version number).
- Allow this app from an unknown publisher to modify your PC.
- Confirm you want to extract and launch the installation.
- Click View Readme for additional explanations (optional).
- Click Install IoTize Studio. If needed, change the installation directory (C:\Program Files (x86)\IoTize\IoTizeStudio by default).
- Click Start install.
- Click "I agree" in the End-User License Agreement.
- Click Finish when the installation is complete.
- Check IoTize Studio is accessible in your Windows start menu.
- View the directories in the installation directory:
- Bin and Drivers should never be modified.
- Doc contains PDF format of the on-line documentation.
- Examples contains:
- The Sensor Demo (used in the getting started documents):
- Project file (senso_demo.iotz) with settings used by the demo, which can be edited with IoTize Studio
- A generic TapNLink serial number: IoTzPr004100000000
- All other configuration variables (bundles, variables, …) are identical to the configuration file stored in your Tap.
- DemoClock and Mems examples illustrate specific advanced features of TapNLink.
- Terminal and Sepam examples illustrate specific advanced features of TapNPass (including access to target system via ModBus).
- The Sensor Demo (used in the getting started documents):
Overview of IoTize project structure and the Studio GUI
Steps to IoTize your target application
You define an App in IoTize Studio:
- In Studio: create a project, defining whether Studio should automatically generate HTML pages, and the protocol Studio uses to connect to the Tap.
- In IoTized Application: define all the other communication protocols, the AAR, and the location of the generated app.
- In Bundles choose the data to be accessed.
- In Profiles choose who will access the data.
Once the App is working:
- Generate App.
- Configure Tap.
- Publish App.
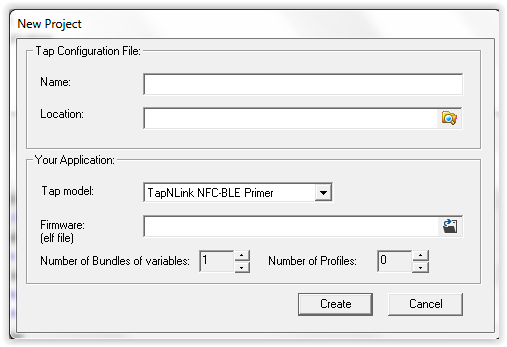
1. Create project
- To create a new project use File | New.
- To modify an existing project, open the corresponding project file (.iotz extension).
Fill in the appropriate details:
- Enter the IoTize Tap Configuration File Name and Location.
- Select your Tap model.
- Enter your target application's Elf file (or CSV file if your model is a TapNPass for a modbus system).
- Define (approximately) the number of Bundles and Profiles (you can complete/rename/remove later).
- **Create** the project
2. IoTized Application options
Set Tap, Target, Wireless comms, Mobile App and IoT Platform options
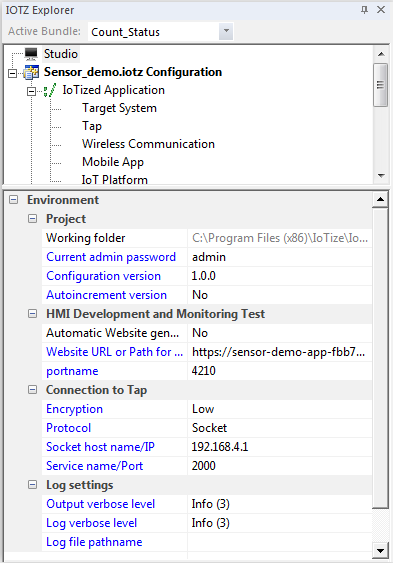
3. Studio options (Environment)
Project:
The version number allows to check that the HTML file and the Tap configuration are the same versions. The version number applies to all configuration subsets: the Tap configuration, the cloud file configuration and the HTML. The config version number structure is XX.YY.ZZ:- The XX and YY part of the version must be managed manually
- If you set Auto-increment to Yes, the ZZ part is incremented whenever you save the project
- When you configure, the project is automatically saved (and the ZZ part of the configuration number is updated if the Auto-increment option is Yes)
- You must take care of the consistency between:
- your Tap configuration (related to the configure command)
- the HTML pages and cloud versions (related to the publish command)
HMI Development and Monitoring Test (for Mobile App Type = IoTize 'Tap Manager' HTML Web Pages):
- Automatic Website generation
- No: displays the HTML pages defined in the "Website Path for Monitoring" (see below). You could access a customized Web app, developed from the HTML pages previously generated by IoTize Studio
- Yes: displays the HTML pages dynamically generated by the built-in HTML page generator. They are automatically updated when you make changes.
- Generation Sub Folder: where the website is generated
- Home page file: the HTML page number is nnnnnnnnnn.profileID.html where:
- 'nnnnnn' is the serial number of your Tap
- 'profile ID' is the ID of the profile, for example 65535 is for admin, 0 for anon. The profile ID can be recovered from the menu "Profile/ Profile name".
- a directory on your PC, or your entreprise network (do not use the Demo default "C:\Program Files" as some files can't be written here). If automatic website generation is Yes, you can only change this by saving the entire project in the new location.
- the deployment location of your app on a cloud server (in the case of the primer, it could be for exemple "user.cloud.iotize.com/IoTzPr0041000000nn/IoTzPr0041000000nn.html or https://sensor-demo-app-fbb73.firebaseapp.com/device?protocol=webview")
Connection to Tap:
- Tap Serial Number Correspond to the Tap you will use during the development stage. It will be read automatically at the fist connection (leave it empty at a first step).
- Encryption
- High (always encrypts, new IV every frame, minimal performance)
- Mid (always encrypts, new IV every 100 frames, medium performance)
- Low (encrypts if requested, same IV, best performance)
- Protocol: connection type between Tap and PC.
- MQTT Relay: for BLE Taps, the smartphone must be used as a relay.
- Socket: for BLE Taps, the smartphone must be used as a relay.
- BLE: you need a BLE enabled PC with Windows 10 build 10586 or newer.
- UART: used for production and mass configuration.
- Socket host name/IP: default 192.168.4.1
- Service name/Port: service name of socket, default 2000
If needed refer here for BLE information and here for relay information .
4. Users and variables
Add Profiles, User, Bundles, Resources, Variables and Features
5. HTML view of variables
The way that values are displayed in the Webview can be configured by selecting the variable in IOTZ Explorer view.
Variable information:
- Name: 'Yes' to display this variable in your app.
- Propose Submit: 'Yes' to make this variable editable. The user also needs permission to modify the value to actually be proposed to do it.
- Display as Floating Point, Display as Unsigned: value display.
- Alias: The label for the variable display.
- Expression: (optional operation) e.g. to convert mV to V, enter: $/1000.0.
- Unit: Physical unit as a string.
HTML Generation:
- Display in HTML: 'No' to not display this variable in the user interface.
- Propose Submit: 'Yes' to make this variable editable. The user also needs permission to modify the value to actually be proposed to do it.
- Display as Floating Point, Display as Unsigned: value display.
- Alias: The label for the variable display.
- Expression: (optional operation) e.g. to convert mV to V, enter: $/1000.0.
- Unit: Physical unit as a string.
Details for the generated App:
- Show in Card: 'Yes' to display the value inside a separated 'Ionic Card'.
- Mode: The way the value is displayed:
- Text: Text field. To make this field editable, the user needs read / write permissions on the corresponding variable, and Propose Submit must be 'Yes'.
- Gauge: Gauge with a min and a max value.
- OnOff: Toggle button. 0 = Off, 1 = On. Labels On and Off can be renamed.
- Buttons: Multiple buttons allow the user to choose one of a predefined set of mutually exclusive options. List of Choices option is a list of comma separated (label=value) sets that define the possible choices: label1=value1;label2=value2;...
- Slider: Slider control with a min and a max value.
- Chart: Line chart, scaled for your data values (Y axis) and measured time (Y axis).
See the App Generator documentation for more information on these parameters.
6. Generate App
In IoTized Application | Mobile App, set App type to Generated App. & Generation System mode to Build Server, then click on Generate App (to use Buildserver).
To see your changes immediately in the Webview, make sure that:
- The User that you want to view is active (highlighted).
- Monitoring is off (click Monitor toggle button).
- Studio | HMI Development and Monitoring Test | Automatic Website Generation is Yes.
Observe the Web Viewer and change some variables:
- Expand Profiles and select a profile. You can see the corresponding page in the Web Viewer.
- The pages take into account the read/write access rights for each bundle.
- You can define the window background color for each page.
- Change some variables and observe that the HTML page is dynamically updated. Click on a variable in a bundle (for example Period in the bundle Count_Control) and change the detailed settings:
- Display in HTML (Y/N): Show this in the auto-generated HTML pages.
- Propose Submit (Y/N): Permit modification of this value from the HTML pages.
- Attach an Alias to the variable.
- Define the number of digits (for float variables).
- Set an Expression to change the displayed value. For example, you could use this formula $/1000.0 to display V instead of mV, where $ stands for original value.
- The monitor button toggles monitoring On and Off.
7. Configure Tap
Click Test Connection, and make sure IoTize Studio is relayed to your Tap, then:
- Click on the Configure button to send the configuration settings from IoTize Studio to your Tap (or use menu Configuration | Write to Tap).
- Check in the output window that the publishing process is OK.
- Click Test | Reboot Tap.
8. Test Debug pages from IoTize Studio
From IoTize Studio, click on the Monitor button
- Login using various profiles to test the pages. If relevant, modify variables from the pages.
- Stop monitoring by clicking Disconnect. At this stage, the HTML pages are only located on your PC
9. Publish Debug pages
If you chose the default cloud location for your Primer you can use the Publish button
- Check in the output window that publication of the HTML pages and the cloud configuration were successful
- If data logging is enabled, it will also transfer the cloud configuration file
- For TapNLink Primers, the upload of a new configuration automatically deletes previous data and configuration (in IoTize Primer Cloud services)
If you chose to publish in Other location you must publish manually.
10. Test Debug pages from smartphone
Tap your smartphone on your Tap
or launch Tap Manager app manually and select your Tap (if your smartphone is not fitted with an NFC reader).
The HTML page opens on the smartphone and displays the view that you created in IoTize Studio.
You can now control the target application from your smartphone.
11. Change HTML pages
You can customize your HTML pages by creating your own .css and .html pages and / or build a native application (refer to mobile development for an overview or go directly to the Application development center).
Note that before (re)publishing your HTML pages, it is preferable to test it from IoTize Studio using your smartphone as a relay.
12. Generate an APK app
You can generate an app and download the APK (from the emailed download link) to your android device and install it. You can use TapCLOUD to download the source code, thne modify it to create a custom app.