Customize your app
Add a new user with access to new information.
To see your changes immediately in the Webview, make sure that:
- The User that you want to view is active (highlighted).
- Monitoring is off (click Monitor toggle button).
- Studio | HMI Development and Monitoring Test | Automatic Website Generation is Yes.
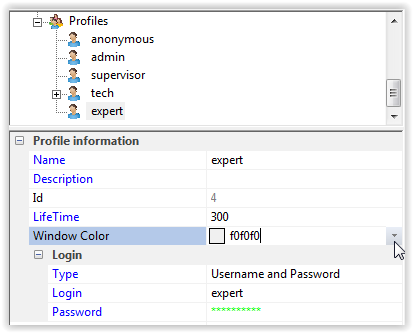
1. Add Profile
- From menu Add > New profile, create a profile named expert.
- In the detailed profile settings:
- Provide a Password, for example expert.
- Set a Window Color for the related HTML page.
2. Add Bundle
- From menu Add > New bundle add Temp_int.
3. Link Profile to Bundle
- Drag and drop expert into the Temp_int bundle (which automatically gives read/write access).
4. Add Resources to Bundle
Resource definition
- Variables:
- Target application variables from the executable file (.ELF)
- Target registers in the SVD file
- Custom symbols : addresses and symbols defined manually by you
- may be on the Target
- may be on the Tap
- Features: Permit certain behaviours (eg authorise remote debugging with SWD)
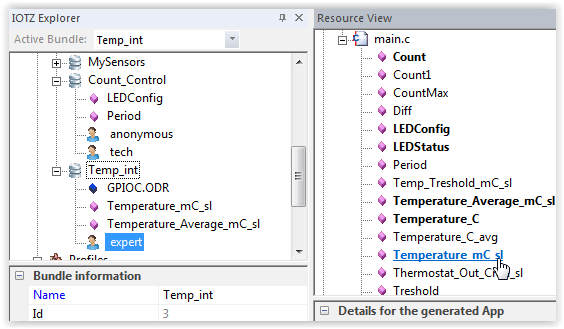
- If the Resource View is not displayed, use menu View > Toolbars and Docking Windows to make it appear.
- Drag and drop resource Temperature_mC_sl and Temperature_Average_mC_sl from the Resource View window into the Temp_int bundle. Both resources are integers (contrary to Temperature in sensors which is a float).
-
In the Resource View, collapse main.C and expand SVD/CSV File. A SVD file contains the internal registers for the CortexM microcontrollers (the format has been specified by ARM). CSV file allow to list easily registers for existing Modbus equipments (see the TapNPass 'Getting Started').
-
Drag and drop GPIOC ODR (internal register) into the Temp_int bundle. The content of this register is similar to the "C variable" LED status, with a small time-shift.

Optional changes
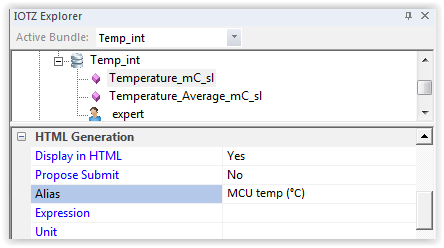
Change variable name in HTML page (alias)
-
Click on the variable in the bundle and add an alias, for example MCU temp (°C) for variable Temperature_mC_sl.
-
Your HTML page should show MCU temp (°C).
Choose if variables can be changed by users
- Change the auto-generated HTML page settings (for example for the variable LED Config). Select LED Config.
- Set Display in HTML to Yes.
- Set Propose submit to Yes to display a data-entry field.
- Toggle these settings and observe the auto-generated HTML pages.
Change profile rights
- Drag and drop profile expert into Count_Control bundle.
- In Count_Control bundle, set expert profile access rights to read.
Turn data logging on
- Set data logging on
- Select the temp_int bundle.
- Set the Datalog Period to 65s for this bundle (setting a value activates data logging).
Complex profiles and resources
See IoTize Studio manual to create more complex Profiles and Resources.