Generating an APK mobile app (with BuildServer)
IoTize Studio Generate App button automatically generates your mobile app using a tool called IoTize BuildServer (also accessible from Tap Manager) which:
- builds the project and generates an APK version (debug mode) of the generated project (Android app).
- can also generate a complete project that you can download (either to complete it manually, or to open in Studio to ensure that you are using the correct configuration for this project), accessible from Tap Manager.
PreRequisites
You should understand how bundles and profiles work.
To read more information about Tap Manager, click here.
You should have created a Buildserver account and registered your Tap. To create an account, click here.
Check the IoTize Studio IoTized Application | Mobile App settings are appropriate:

- App Type = Generated App.
- Generation System Mode = Build Server.
- App AAR for Android = Unique NFC application ID.
- Connect the Tap and click on Configure, then Test | Reboot Tap.
AAR: The Android Application Record is UNIQUE. It allows your app to start automatically.
The AAR is registered in the Tap when you configure it. When an NFC phone detects an AAR, it asks the phone to launch the corresponding application (if it is not installed it searches in your PlayStore).The Sensor demo app you downloaded from PlayStore is secure, so you cannot install another app that uses its AAR (com.iotize.app.sensordemo). You must use a new AAR and reconfigure the Tap.
This ID must be unique if you want to publish your app on the PlayStore. It is best practise to have a unique ID for your local testing to avoid conflicts.
Android App IDs are written as reversed URL (e.g. com.iotize.sensordemo.app).
The AAR can be seen (and modified) at the top of the "config.xml" file of the generated project.
Generate the APK app
This method varies slightly depending on the apps current status.
1. Generate a new APK app
- In IoTize Studio, click PROJECT | Login to log into the Cloud.
- Click on Generate App. This opens the following popup:
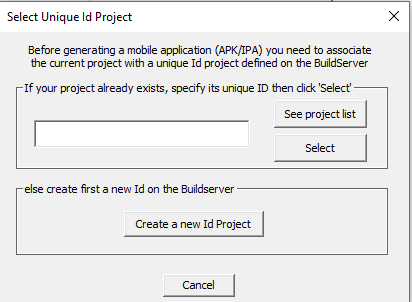
- Click on Create a new Id Project. The new project name appears in Mobile App | Generated App Settings | IoTize Cloud Project Id. The project is uploaded to the IoTize Cloud website.
- Click on Generate App again to build the app.
Check in Studio output that the Generation started, and click Generate App if not.
Once the app is generated (may take 3 minutes), you receive a download link at your IoTize Cloud account's email address, and you can see the build status history in the Cloud.
2. Regenerate an existing app that is already open in Studio
- Click on Generate App to regenerate this app.
- Click on Configure, Test | Reboot Tap if you changed the AAR /Profiles /Bundles /passwords /pathnames.
3. Regenerate an existing app that is not currently open
You need to retrieve the project, using either Studio or Tap Manager.
Using Studio:
- Log into the Tap Manager cloud account from PROJECT > Login.
- In IoTize Studio, Mobile Application, empty the IoTize Cloud Project Id.
- Click on Generate App. This opens the following popup:
- Click on See Project List. Copy the Unique Identifier into the popup.
- Click Select. Signon again. Click Select. Click Generate. The project name appears in Mobile App | Generated App Settings | IoTize Cloud Project Id. The project is uploaded to the IoTize Cloud website.
- Click on Generate App again to build the app.
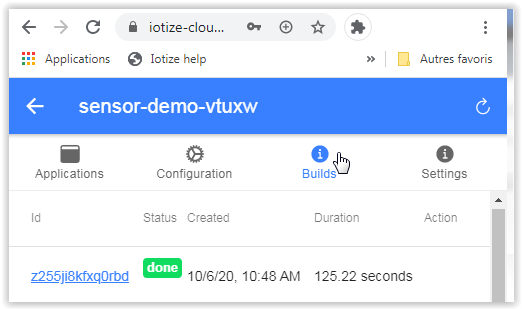
Using Tap Manager:
- Logon to Tap Manager cloud account.
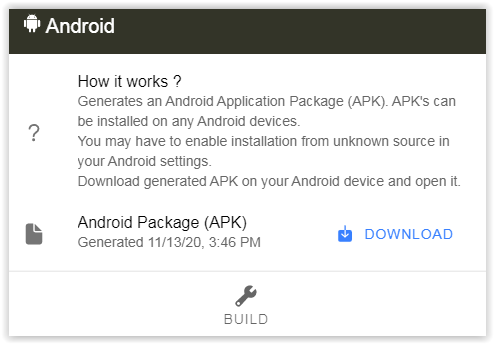
- Select Apps, then click on the App you want.
- Choose Android | Build then Download (top right).
If you need to modify the project before regenerating:
- Logon to Tap Manager cloud account.
- Select Apps, then click on the App you want.
-
Choose Project Source | Build then Download (bottom right)

-
In IoTize Studio, File | Open the .iotz in the downloaded project.

Check that the configuration is the one you wanted.
3. Download and install APK on your mobile
Using Studio:
- Download the APK from the emailed download link onto your android device.
- Find the .apk and doubleclick it to install the app.
Using Tap Manager on your phone: click on your project, find the Android window and select Download, Open and install it.
If you used the Sensor demo AAR, you must remove the Sensor demo app from your phone).
4. Run the APK
Tap your TapNLink with your phone.
If you want to test the App again from Studio, don't forget to set Studio | HMI Development and Monitoring Test | Automatic Website Generation to Yes.
5. Go further with your app...
Once generated, you can download the source files of your project from Tap Manager. These source files can be modified and rebuild locally thanks to Android Studio. An IPA for iOS can also be generated from this project on a MAC computer.