Add your own code
Prerequirements
If you don't have Oracle javac compiler, install Oracle OpenJDK suite to obtain javac.exe.
IMPORTANT NOTE:
The embedded JVM is only tested with the version 1.8.0 of javac compiler. We recommend to install and use Open JDK 1.8 that is also used by Android Studio. Note that using another version of the JDK could rise errors such as "unsupported methods" for the String class handling.
But if you have a more recent version, the version to be considered can be also specified by using the '-target' and '-source' arguments:
javac.exe -classpath "C:\Program Files (x86)\IoTize\IoTize Studio\JVM" -g -version -source 1.8 -target 1.8 ".\java_src\SensorDemo.java"
1. Explore the examples and the native classes in Studio
Once Iotize Studio is installed, you'll be able to explore the Examples and JVM directories to find:
-
In '\Program Files (x86)\IoTize\IoTize Studio\JVM\com\iotize\jvm', the set of declaration files for native classes.
-
In '\Program Files (x86)\IoTize\IoTize Studio\Examples\JVM', some simple examples,
-
In '\Program Files (x86)\IoTize\IoTize Studio\Examples\TapBus', the main files of the TapBus modules (the most important classes are in JVM\com\iotize\jvm\TapBus),
-
Each sample directory can also contain a Java subdirectory.
2. Create your .java file
We recommend two methods to create your Java file:
-
either you use the skeleton automatically generated by the Wizard when you create a new project in IoTize Studio,
-
or you take a copy of a java file from the examples and rename it to the name of your class.
Then you can either:
-
edit the file into Studio's Java editor :

-
or work within Ride7 + Rkit-Java. This solution allows to debug your Java program.
-
or use your preferred editor and just launch the compiler from Studio.
Keep these import commands unchanged:
- import com.iotize.jvm.*; // System classes (Variables)
- import com.iotize.jvm.hal.*; // HAL drivers (UART)
Create a public class (with the same name as the file) and:
- mandatory onException() and onCheck() methods
- optionally a constructor and onEvent methods
- and whatever other features you desire that are supported by IOT_JVM.
3. Compile and assemble your Class, and add it to IoTize Studio configuration
Compile your Java class with javac.exe ( icon in Studio's Java Editor). The same command is also available in the main menu: "Configuration" | "Run Java compiler"
If you get an error message saying javac is not installed:
- Open the Start Windows.
- Search for *environment*, then select *Edit environment variables for your account*.
- Click on the *Path variable* and *Edit*.
- At the end of the variable value, type *;* then paste the pathname of the directory that contains the javac.exe. (e.g. *;C:\Program Files\Java\jdk-14.0.2\bin*)
- Any compiler errors before the 2 ============= separator lines are javac call errors that must be resolved first. They are 'standard java errors' that must be fixed considering the Java language specification.
- Errors after these lines are generated by IoTize 'IOT_JVM' linker utility. They generally indicate that the current code cannot be executed withing the TapNLink environment. Most frequent errors issued from iot_jvm.exe report calls to unsupported Java class or method. Contact IoTize support if you have problems.
4. Link your Class file(s)
Link the resulting TapNLink_User.class file using IOT_JVM.exe (in ‘IoTize Studio/bin’ folder) to check compliance with the IOT_JVM environment and produce a .bcb file. This is done automatically by Studio (or when using the RKit-Java under the RIDE7 Integrated Development Environment). If your project contains several classes, declare only the main file (e.g. the main class). The other files will be automatically loaded and added to the bcb file.
Check the again messages, and verify that your Tap's firmware is the same version as the most recent method (currently version 1.106). If it isn't, please update your firmware to obtain the most recent methods.
5. Add to IoTize Studio configuration
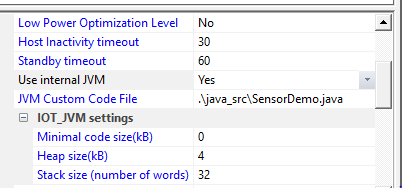
Add the path of either the .bcb or the .java files to IoTize Studio in Tap / JVM Custom Code File.
6. and specify the parameters of the running environment
There are 3 parameters to specify:
-
Minimal code size(KB): You could leave '0' as minimal code size (MIN_SIZE). In this case, the resulting bcb file will be saved at its real size (REAL_SIZE). Otherwise, the bcb file could be extended with zeroes to reach MIN_SIZE. In other words, we have: BCB_SIZE = MAX(MIN_SIZE, REAL_SIZE). Why extending the bcb size ? When debugging within Ride-7, if you want to modify the byte code after a minor change, the code will be overwritten in the previously allocated space. If your new code is larger than the initially allocated space, debugging will not be possible. Thus, we recommend to declare a few KB more than REAL_SIZE as long as you are in the debugging stage.
-
Heap size(KB): an unique global buffer is allocated in RAM for the need of the JVM data. This buffer contains the Heap, but also the internal variables and the stack. Once your development will be finalized, you could adapt the Heap size in order to save memory (the Ride-7 debugger displays the available memory in the Main Register window).
-
Stack size (number of words): this is the number of items (32 bit each) reserved for the stack. Note that the stack is allocated from the HEAP during the initialisation stage.
-
Use code compression: A set of new optimizations were introduced in 2023. These processes apply to the old 'bcb' file and generate a new bcb file that is typically half the size. Note that the assembly code is not changed in the new format, only the data structures are reformatted (and reduced in size). We recommend selecting this option which only has advantages. The old format which is still available will soon be removed. Note that the latest versions of the JVM support the old or new (compressed) format equally. If this is not the case for your equipment, you need to perform a full firmware update.
We recommend using first the simulator to check that the above specified values make sense for your program. When executing the Java program, both the BCB and the Heap will be located in the RAM of the TapNLink MCU and you should adapt these values to avoid a lack of memory.
More information about IOT_JVM can be found here.
Things to know
-
Do NOT create a class that inherits from native classes. Inheritance is supported only from user's classes.
-
There are two types of InTap variables: volatile and non-volatile. The contents of non-volatile InTap variable is lost when resetting the Tap (stored into volatile memory).
-
In case two TapNLinkVar variables need simultaneously to be checked, the order of the declarations of the TapNLinkVar variables defines the priority.
-
The value of a TapNLinkVar will NOT be initialized at the constructor, but just before the first call to onCheck(). For example, if you define a TapNLinkVar object with a periodicity of one hour, getValue() will return a dummy value until onCheck() is called for this variable (after one hour). A workaround consists in reading directly the variable (either inTap or external) through a call to the lwM2M.
-
If you set a null value for the periodicity of a TapNLinkVar object, the onCheck method will not be called for this variable. In this can you still can manage periodically the variable by starting a global timer (that will call the onEvent() method).
-
when the execution of a method takes too long, it will be interrupted by the lwM2M, then resumed. In the same way, when the system.pause() method is called, lwM2M can be executed in order to answer to any external request (if any).This time slicing is done automatically.
-
try/catch actually working with TapNLinkException to contains error number.
try {
/* Your code */} catch(TapNLinkException error) {
/* If your code generate exception then it passed here */}
- The garbage collector frees the memory on specific run times:
- After the execution of the main class constructor,
- After the execution of the onCheck method,
- After the execution of the onEvent method.
Be careful to not expose the Tap to an out of memory error by blocking the garbage collector execution.
- If the JVM ended on an execution error, a log message will be stored. You can retrieve the message through IoTize Studio: it will appear in the console view when you connect to monitor the Tap.
Examples
Various examples are available into "IoTize\IoTize Studio\Examples\JVM\" when you install IoTize Studio.
You will also find a simple example that demonstrates how to connect an I2C sensor here.
For more complex examples, you can refer to the support site.
How to debug
A few lines are often sufficent to be the perfect complement to the lwM2M machine. But if you decide to write more than 100 lines of code, you will probably need to debug your code (at least to look at your memory consumption).
Debugging with Ride-7
For this purpose, a free debugger environment is available on the Raisonance web site. Ride-7 provide a complete environment to run a debug session in two possible modes:
-
either in simulation,
-
or in real-time mode, through the lwM2M. For real-time debugging, we recommend using Wi-Fi.
In association with the RKit-JVM, Ride-7 features the following debug facilities:
-
set breakpoints on code addresses (up to 8),
-
watch objects and variables,
-
execute either at the source level, or at the assembly level,
-
visualize stack, heap and code spaces.
Other debugging hints
Another simple way to get debugging information consists in emitting logs. For example:
system.log(String.format("My counter=%d", myCounter),0);
Exceptions
When an unexpected exception occures you get various information that will help (for example by connecting with Iotize Studio) :
-
the current JPC (Java program counter)
-
JSP (Java stack pointer).
-
You will also get the error code (and the linked message).
The JPC value will allow you to determine which source line causes the exception: open the map file and seach for the specified JPC. The map file is the listing generated by IOT_JVM.exe.
The most common errors that throw an exception are listed below. Note that some of these errors are just for internal purpose and are not supposed to be encountered:
| code | message | cause / remedy |
| -2 (0xfffe) | Stack overflow | Increase the stack size |
| -3 (0xfffd) | Not available | Retry later (connection to MQTT broker,...) |
| -4 (0xfffc) | Unknown method | The method is not implemented |
| -5 (0xfffb) | Null pointer | A non-null pointer is required |
| -7 (0xfff9) | Invalid opcode | A non-valid instruction is encountered |
| -8 (0xfff8) | Divide by zero | A division by zero has been performed |
| -9 (0xfff7) | Out of memory | Increase the heap size |
| -10 (0xfff6) | Negative array index | Array element accessed with a negative index |
| -11 (0xfff5) | Invalid cast | Cast cannot be applied |
| -12 (0xfff4) | Array index out of bound | |
| -13 (0xfff3) | Incorrect parameter | For example with String.format |
| -14 (0xfff2) | Reading variable | Check id/type/size of the variable |
| -15 (0xfff1) | Writing variable | Check id/type/size of the variable |
| -16 (0xfff0) | Invalid var type | Check type of the variable |
| -17 (0xffef) | Unsupported class | |
| -18 (0xffee) | JPC out of bound | Current program counter is out of code |
| -19 (0xffed) | Writing variable | Current stack pointer is out of bound |
| -20 (0xffec) | Unknown class | |
| -21 (0xffeb) | Wrong poped reference | Wrong parameter. |
| -22 (0xffea) | Too many parameters | For example when calling String.format() |
| -23 (0xffe9) | Stack frame | Stack frame is broken when executed a return instruction |
| -24 (0xffe8) | Invalid file | The calculated CRC of the BCB is wrong |
| -25 (0xffe7) | BC too recent | Byte code file is too recent to be supported by this JVM |
| -26 (0xffe6) | BC too old | Byte code file is no more supported by this (recent) version of the JVM |
| -27 (0xffe5) | String too long | |
| -28 (0xffe4) | Illegal allocation | |
| -29 (0xffe3) | Break | Illegal occurence of the break instruction |
| -30 (0xffe2) | Invalid handle | Handle does not points to a correct object in heap |
| -31 (0xffe1) | Invalid pointer | Handle does not points to a correct object in heap |
| -32 (0xffe0) | Wi-Fi disabled | Wi-Fi (or LTE-M) is not available for MQTT command |
| -33 (0xffdf) | Inconsistent heap |
The most frequent exceptions are:
-
BC too recent (or too old): you need to update your firmware (or your Java tools).
-
Out of memory, either for the heap (-9) or for the stack (-2). In this case, increase these sizes (command line parameters).
-
Unknown class (-20) or method (-4): you probably use a standard Java method (or class) that has not been implemented in this optimized JVM.
-
Null pointer, Array out of bound, ...: these are real errors, and you need to understand why they occur to correct your code.
Most of the other run-time exceptions are just potential, but should not occur.
Native classes
The native classes cover both the classic classes of the language, and those specific to the TapNLink hardware environment.