App Generation Example: TapNPass/Tapioca and Modbus
In this section, we generate a mobile app for a product that is equipped with a TapNPass wireless-Modbus adapter. This app will communicate with a device through the TapNPass (or Tapioca), using Modbus-RTU communication protocol.
1. TapNPass Connection
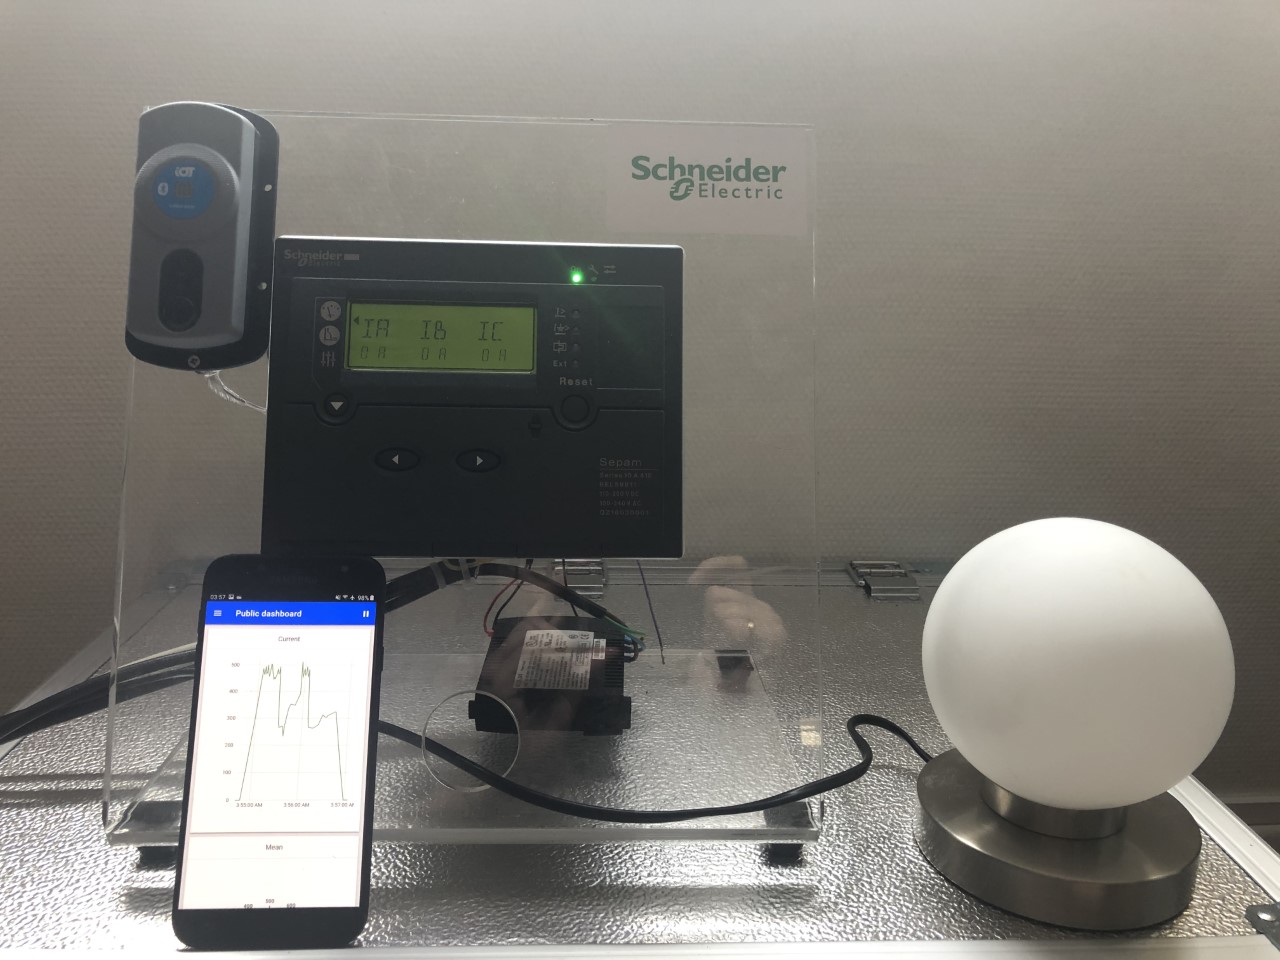
The target product used in this example is a Schneider Electric SEPAM10 protection relay but the procedure is the same for any Modbus-RTU available device.
1.1 Modbus Target Settings
Here are the settings we will use in Section 3.2 to configure the Modbus communication in IoTize Studio IoTized Application | Target System, and the variables (set in Section 3.3) we are going to monitor, or control.
| Settings | |
|---|---|
| Serial Port | RS485 |
| Target Protocol | Modbus |
| Slave Address | 1 |
| First Register Address | 1 |
| Baudrate | 38400 |
| Parity | None |
| Length | 8 |
| Stop bits | 2 |
| Handshake | None |
| Timeout | 50 |
1.1.1 Modbus Variables
| Name | Address | Unit-size | Quantity | Byte Order | Comments |
|---|---|---|---|---|---|
| I1 | 0x130 | INT32 | 1 | B3_B2_B1_B0 | |
| Imean | 0x13A | INT32 | 1 | B3_B2_B1_B0 | |
| Imax | 0x140 | INT32 | 1 | B3_B2_B1_B0 | |
| Telecommand | 0xF0 | INT16 | 1 | B1_B0 | Writing 2 to this variable sends the Rearm command on the SEPAM10 |
1.2 Hardware Installation
The TapNPass supports physical connection on USB, or RS485/RS232 via an RJ45 connector, and comes with different cables adapted to each type of connection.
In the case of our SEPAM-10 device, Modbus is available on a simple screw terminal. The fastest way to connect is to use a simple RJ45 Ethernet cable, cut it in two sections and wire one section to the terminal according to the following table:
| Cable | Signal | RJ45 pin |
|---|---|---|
| Blue | Modbus A | 4 |
| Blue/White | Modbus B | 5 |
| Brown/White | DC+ | 7 |
| Brown | DC- | 8 |
Modbus only uses the Blue pair to communicate. However, you may use the Brown pair to power the TapNPass Fixed version (the Nomad version cannot be powered by this connection).
If you don't know how to distinguish the Modbus A and B signals, don't worry, inverting them will not damage TapNPass or the target. It will cause the communication to fail. If you invert these, you can easily unscrew and change these connections to test the second combination.
1.3 Testing With Toolbox
Now that the TapNPass is connected to your device, we will test it using IoTize ToolBox.
Toolbox is a free mobile app that allows you to send simple Modbus frames through your TapNPass. You can find it either on the Play store or the App store:
TapNPass default configuration allows ToolBox to make direct Modbus requests.
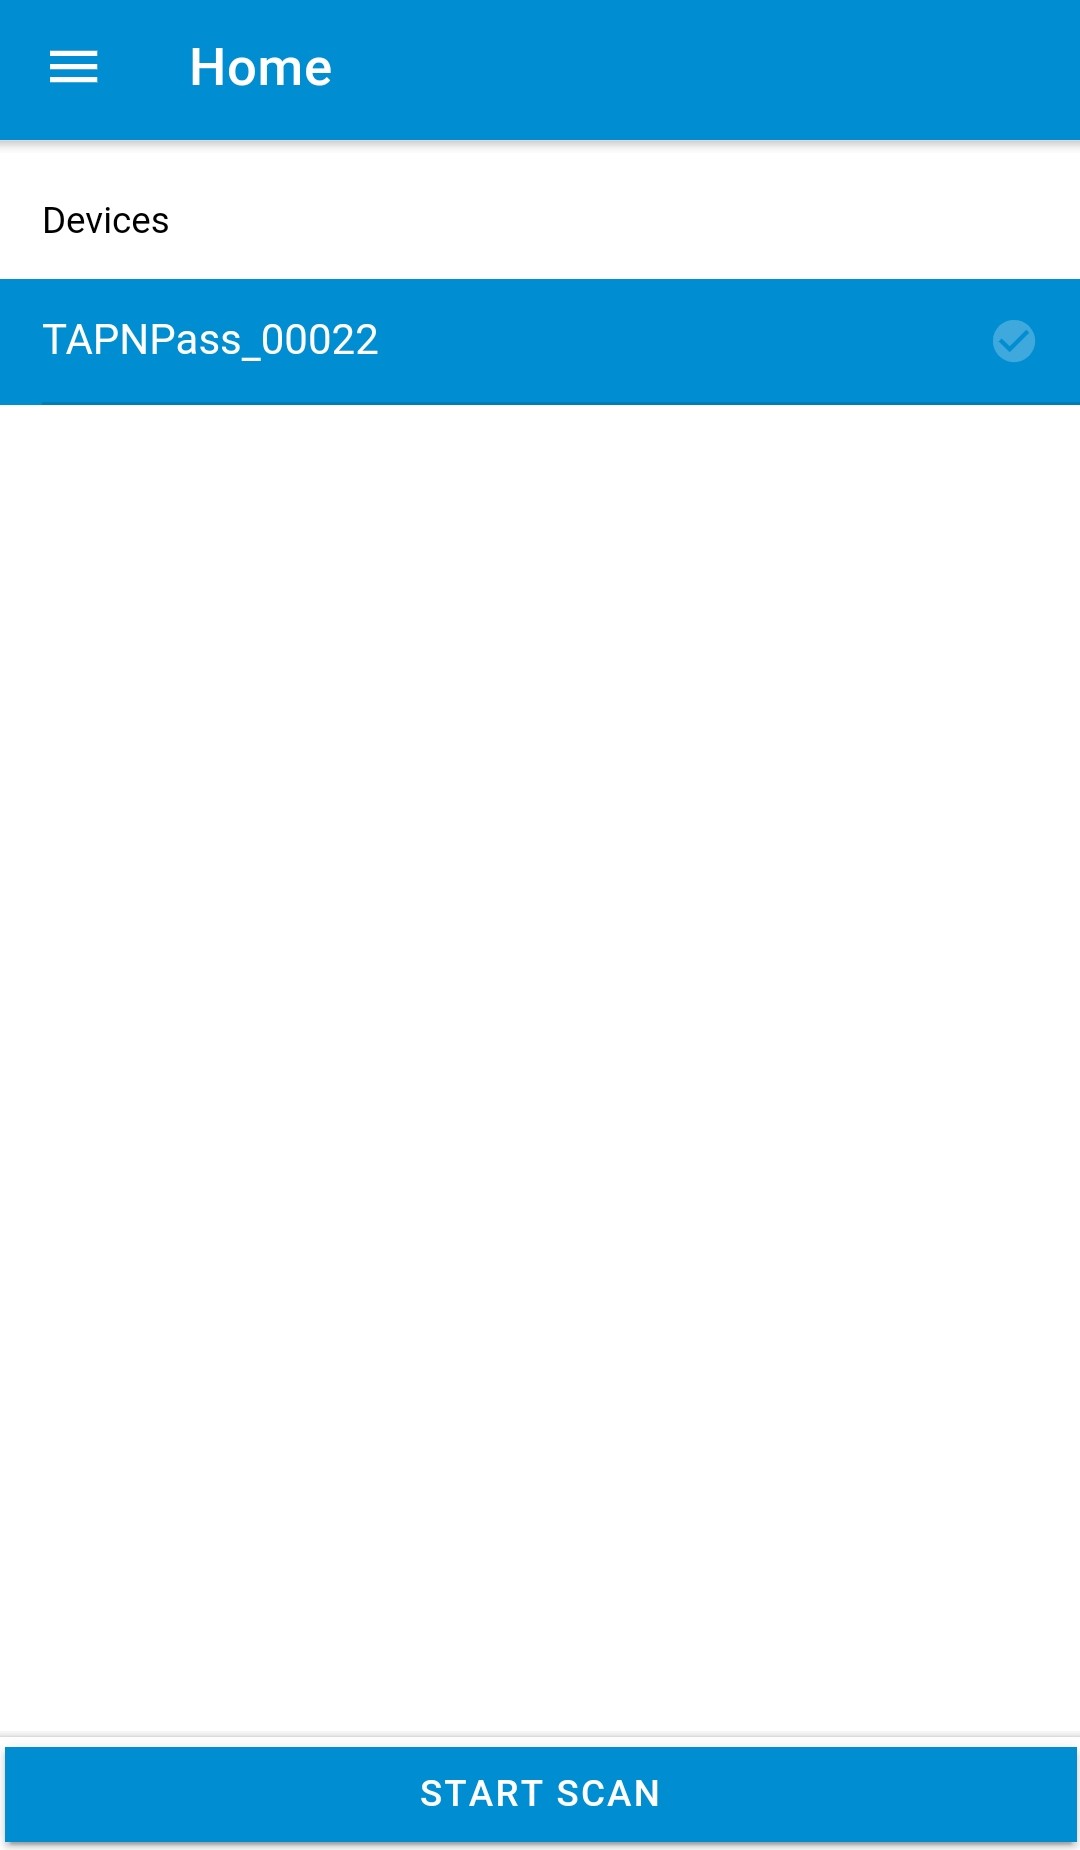
Install the app on your phone and launch it. It will open on the connection page: Click on the BLE SCAN button to find available devices, and click on your TapNPass to connect to it.
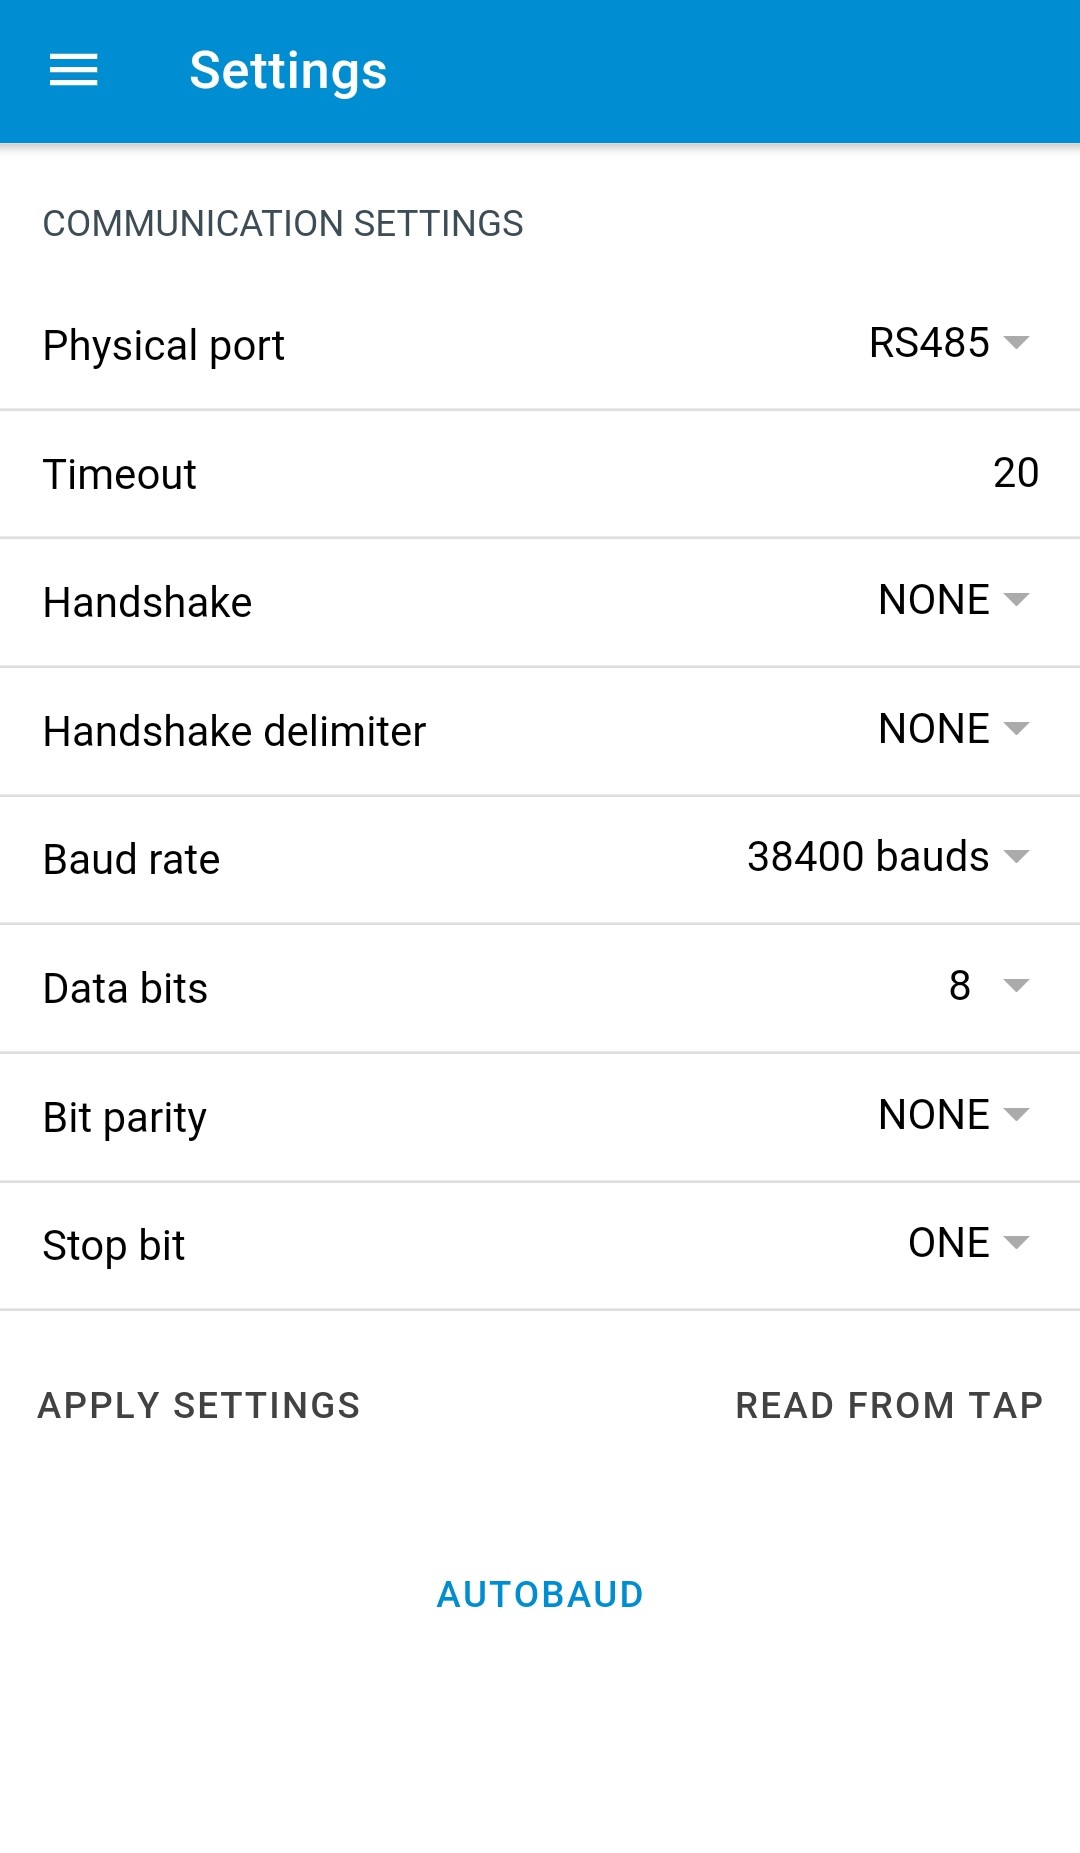
Open the menu (click on the upper left corner or swipe from left) and open the Settings panel.
Set the communication settings according to your device parameters. Then, click on Apply Settings.
If your TapNPass has already been reconfigured, you may encounter the following error: Ox81: UNAUTHORIZED. If so, you can log as an admin user to be allowed to update the settings and send Modbus requests. This can be done with the Login button in the menu (default credentials are username admin and password admin).
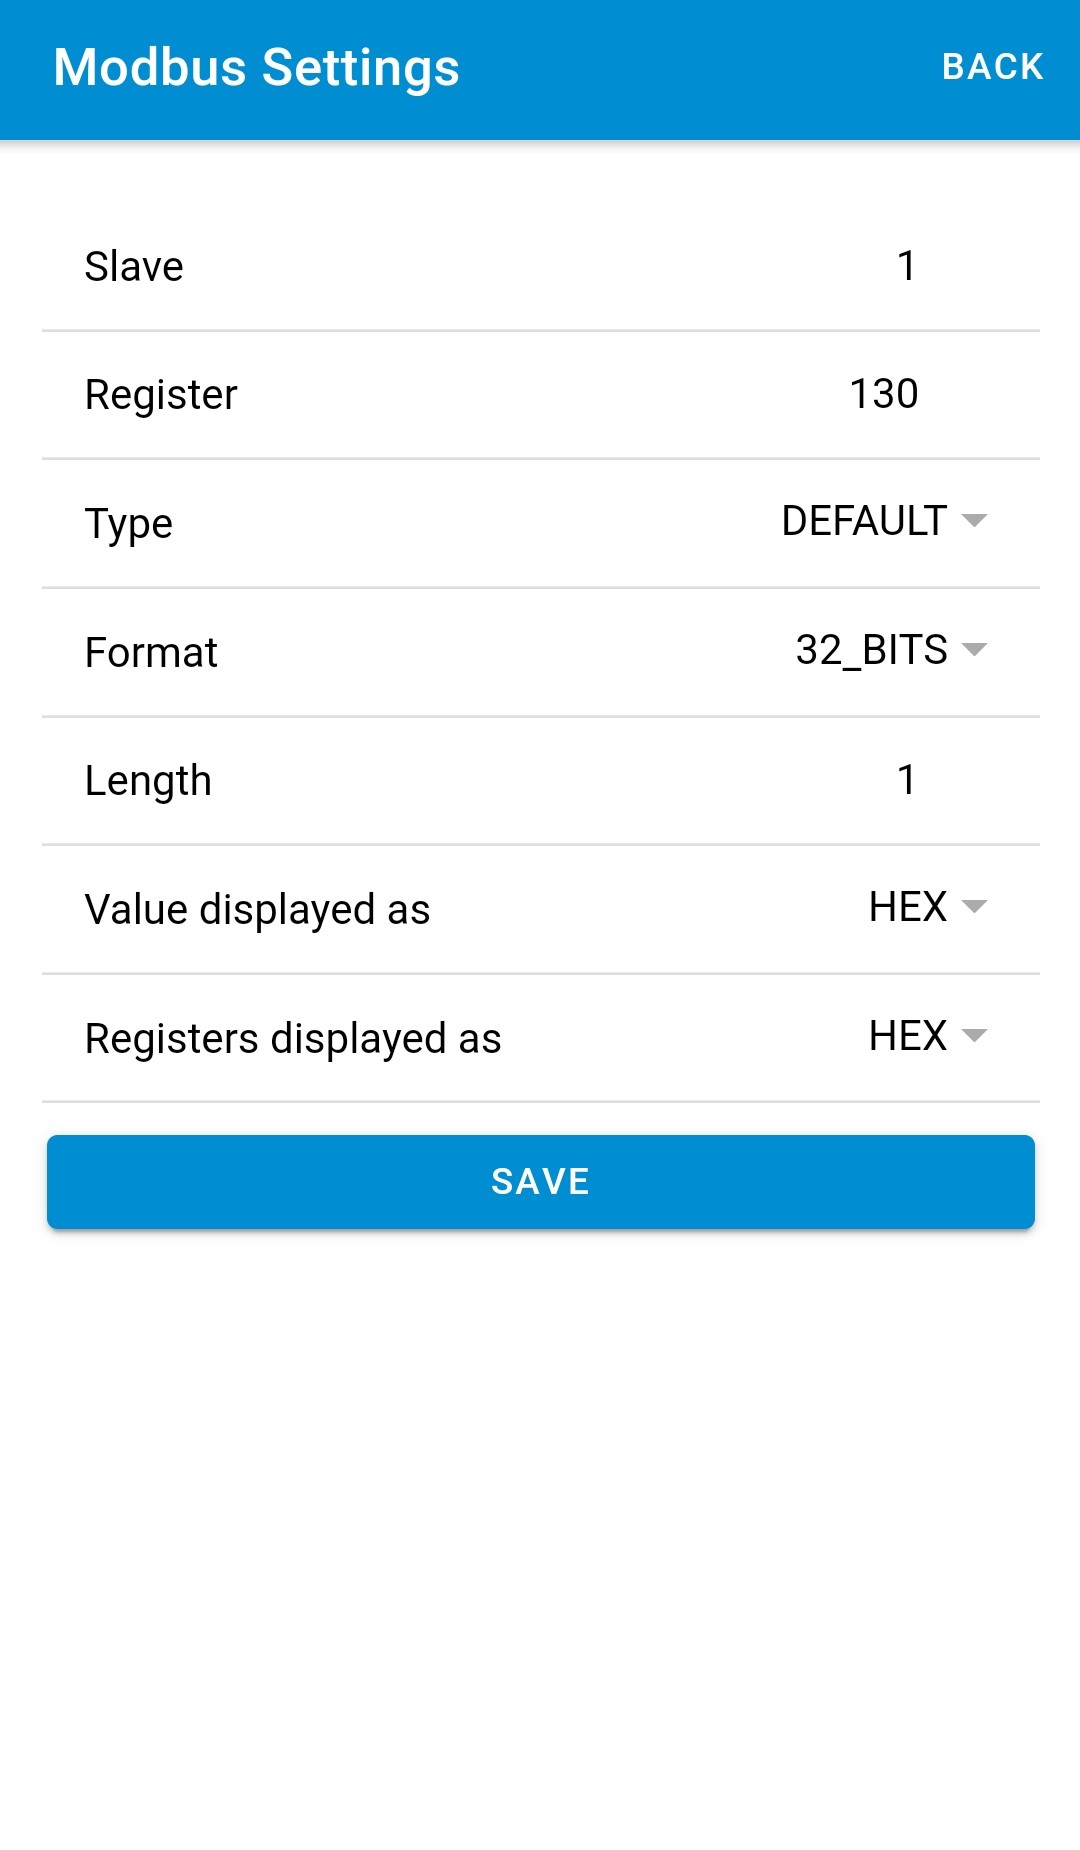
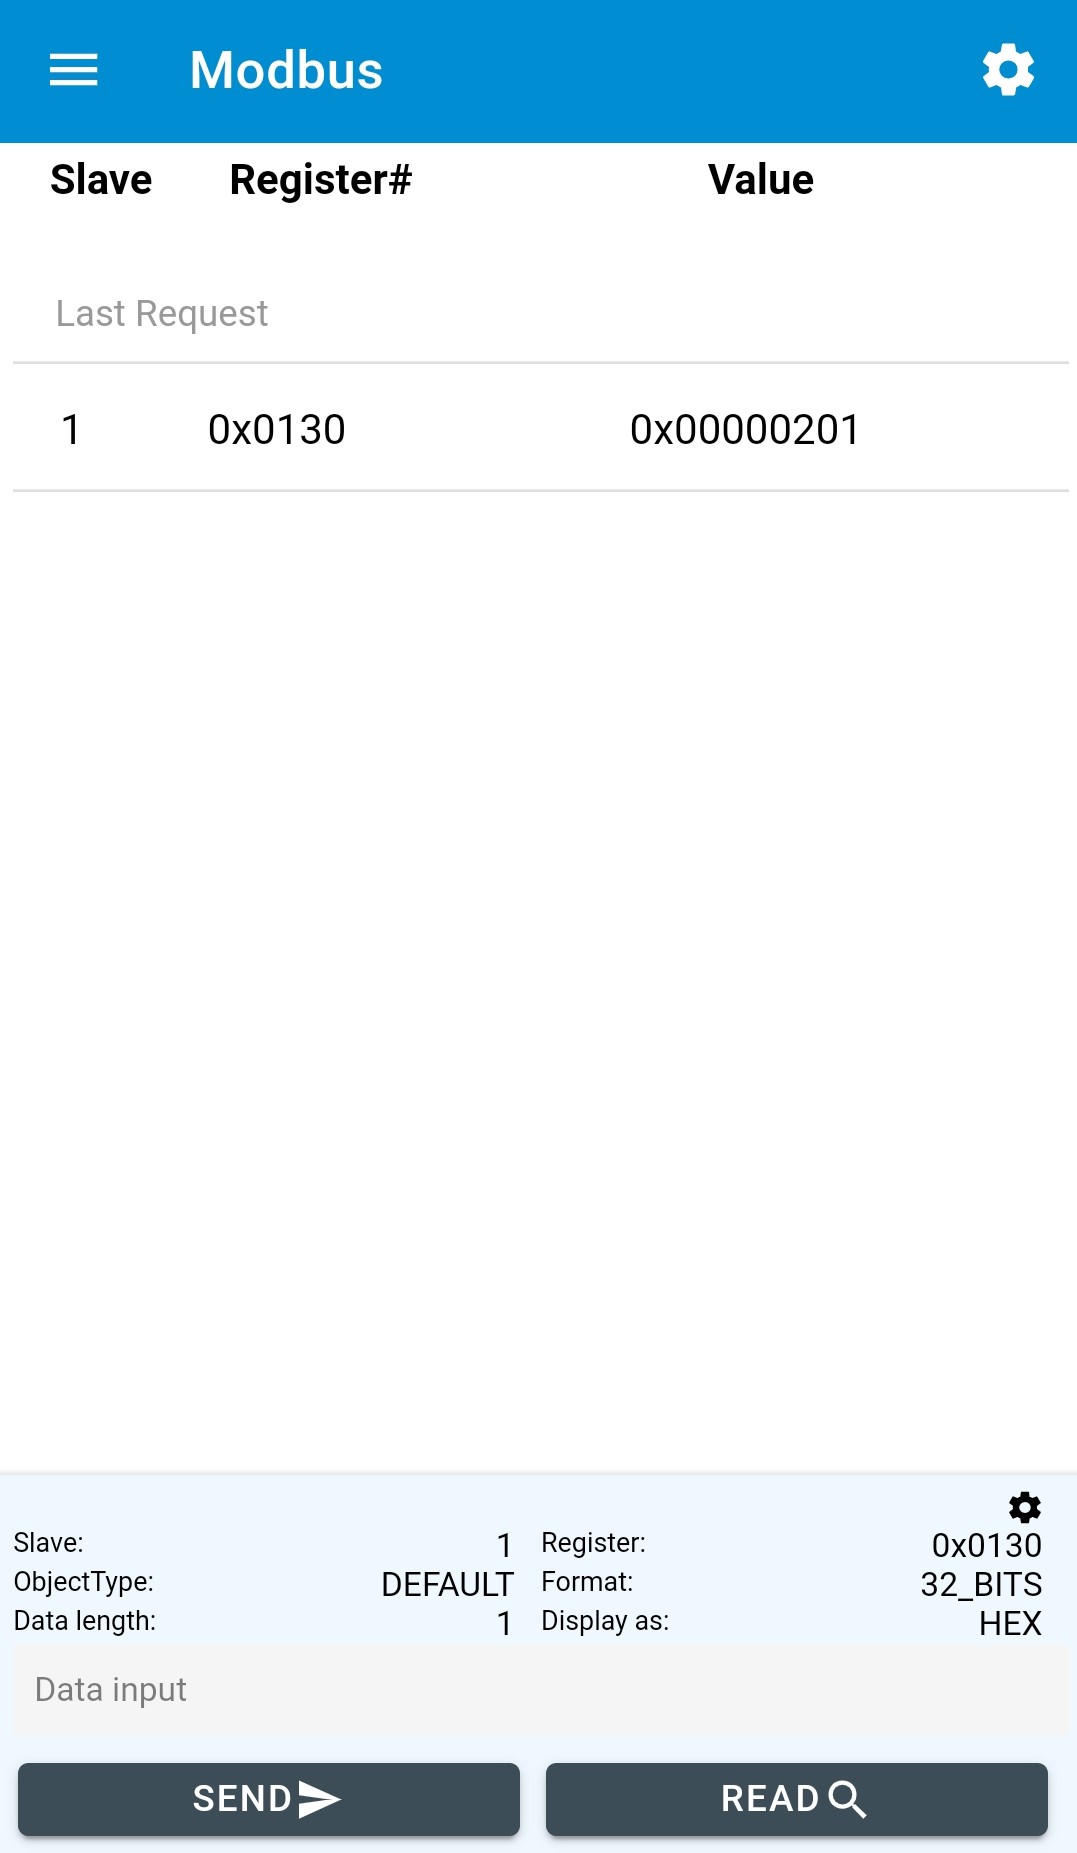
Open the menu (3 bars) and choose Modbus. Open Modbus Settings by clicking on the gear icon in the upper right corner, or on the displayed parameters. In this panel, set the parameters according to the modbus request you wish to send, and click on Save.
Then, click on Read to send the Modbus request. If you want to enter data, use the Data Input field, and click on Write. For a read request, check the response to the request in the Toolbox. For a write, verify the response on the target device (ex. a value has changed that is visible on the device or that triggers an action).
If the request failed, verify that the communication settings match your Modbus target device settings. If TapNPass is connected on a screw terminal, you can try switching the Blue connections (Modbus A and B) to check if these connections were inverted.
Read requests display data in B3_B2_B1_B0 byte order. Check the IoTize ToolBox Documentation to see how to find your own modbus parameters.
After the TapNPass is connected to your Modbus device and the communication has been tested, you will use the IoTize software to configure the TapNPass.
2. Software Requirements
To create an app, first install the following software:
2.1 IoTize Studio
The configuration tool for all IoTize products. You can download it here.
3. TapNPass/Tapioca Configuration
3.1 Project Creation
Open IoTize Studio, and create a new project (File | New, or CTRL+N). You will see the following screen:
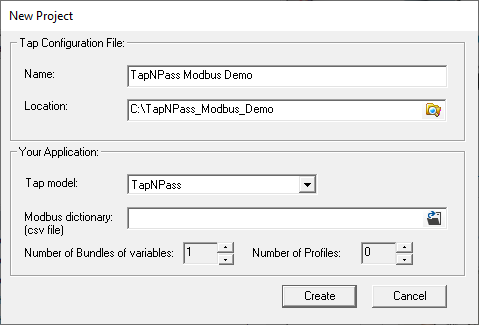
Give it a name and a location. In Tap model, choose TapNPass, and click on create. You may also provide a Modbus Dictionary if you have one.
The Modbus Dictionary is a CSV file that lists Modbus variables with their own parameters. In this presentation, we are going to create these variables manually. If you want to create a CSV Modbus Dictionary, go to section 3.1.1. below. Otherwise, you can go straight to Communication Settings.
3.1.1 Generate a Modbus Dictionary CSV file
To create your Register Dictionary, you can use our Excel spreadsheet template, which you can download here:
IoTize Modbus Register Dictionary generator
Open this spreadsheet and go to the Registers List tab. Here, enter the information for the Modbus variables of your target device:
| Property | Description | Possible Values | |||||||||||||||||||
|---|---|---|---|---|---|---|---|---|---|---|---|---|---|---|---|---|---|---|---|---|---|
| Name | The name that will be used by IoTize Studio to refer to the variable | String* | |||||||||||||||||||
| Address | The modbus address of the variable | Integer or Hexadecimal value example 0xF0 | |||||||||||||||||||
| Group | Name of the set the variable will be grouped in. This does not corresponds to any Modbus parameter, but helps to organize them in IoTize Studio, especially if there are lots of registers. | String* | |||||||||||||||||||
| Type | Data type of the variable. The first letter stands for signed s, unsigned u or float f, followed by the number of bytes. |
|
|||||||||||||||||||
| Quantity | Number of Type values to fetch. These will be given as an array of Type. | Integer | |||||||||||||||||||
| ByteOrder | This represents the endianness of the variable. Only for 16- and 32-bits types. |
|
|||||||||||||||||||
| Slave | The address of the slave that the variable refers to. | Integer | |||||||||||||||||||
| DataModel | Data model used by your Modbus implementation. If you don't know which is used, set it to *Default***. |
|
This spreadsheet is configured to create a CSV file in a predefined format. DO NOT change its structure, otherwise IoTize Studio might not be able to read your Modbus Register Dictionary..
*The CSV uses commas or semi-colons as separators. String properties (Name and Group) must not contain these charaters.
**These values can be selected within a dropdown menu that appears when the cell is selected

3.2 Communication Settings
Now that the project is created, go to IoTized Application -> Target System in the IOTZ Explorer view, and enter your Modbus communication settings (as described in section 1.1):
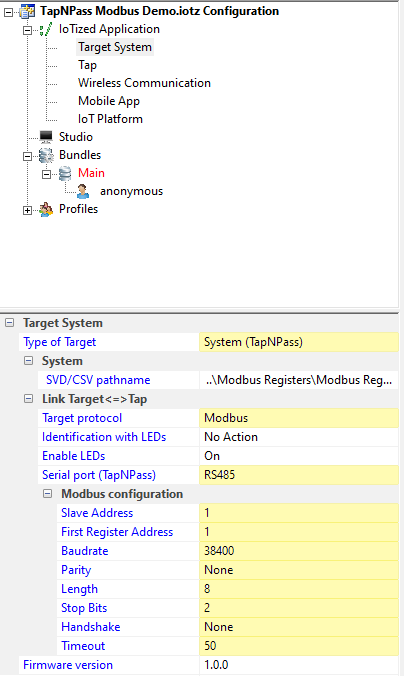
If you have a Modbus Register Dictionary (SVD/XML/CSV), you may specify it here. This will create the list of the variables linked to your system.
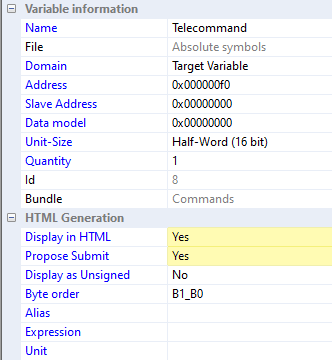
3.3 Variable Settings
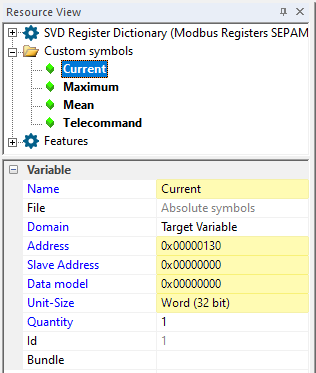
Inside the Resource view, right click on Custom symbols and select New absolute symbol. Then click on the new symbol, and fill in the proper information for it: modbus and address and unit-size (described in section 1.1). Here are the properly set variables for our example:
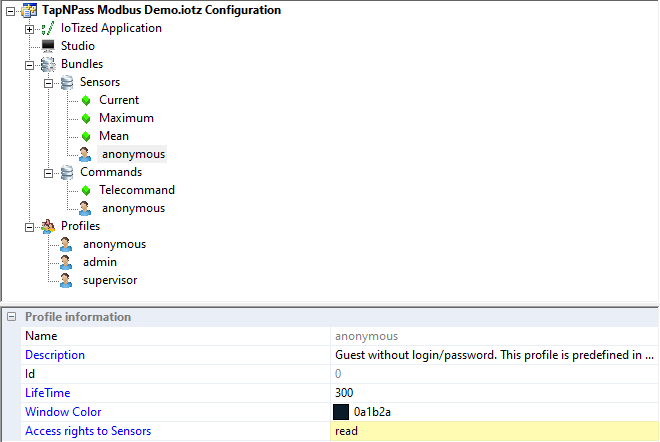
3.4 Users
A TapNPass configuration can contain users with different access rights. Here, we will use the predefined anonymous profile, to allow access to the current configuration without logging in.
See User Documentation for more information on how to create users and set their access rights.
3.5 Bundles
Bundles are sets of variables that share the same user access rights.
Here, we will create a bundle Sensors to group variables with read only access (Current, Maximum, Mean): Right click on Bundles, click on New Bundle, and rename it to Sensors. From the Resource View, drag and drop these variables into the bundle.
From the Profiles, drag the anonymous user and drop it in the bundle. This allows anonymous to access the variables in Sensors. Select the user in the bundle and make Access rights to Sensors = read.
Anonymous is the default profile used for anyone who connects to a TapNPass and has not logged in.
Now create a new bundle named Commands. Add the Telecommand variable to this bundle. Drag and drop the anonymous profile in this bundle. Change the Access rights to Commands to write.
See Bundle Documentation for more information on bundle creation and parameters.
3.6 HTML Generation settings
Now that variables are linked to bundles, we define how the variables should be displayed. Click on a Sensors variable: you will see in the IOTZ Explorer its HTML Generation settings. Define these according to the variable (Display as Floating Point: No, Display as unsigned: No, Byte Order: B3_B2_B1_B0), and repeat for each variable.
For the Telecommand variable, set Propose Submit to yes. This will create the associated input in the generated app, as the variable is writeable.
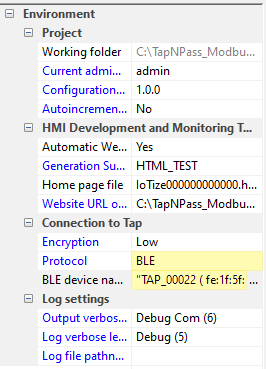
3.7 Connection to TapNPass
In IOTZ Explorer, select Studio.
Here, set your communication protocol to connect your computer to the Tap. You may use direct BLE if available on your computer, or socket, with the Tap Manager Relay (Android or iOS).
See this documentation for more information on how to set this connection. Here, we will use the computer's BLE to directly connect to a NFC/BLE TapNPass.
3.8 Configuration and Tests
Once the communication with your TapNPass is enabled, test it with Test -> Test Connection. On the first test, you will be asked if you want to update your project with data from the TapNPass (Serial Number and cloud information). Click OK.
Click on Configure, then Test -> Teboot Tap to upload the configuration we made into the TapNPass. Then, click on Monitor to test the configuration on the Generated HTML that is displayed on the right side of IoTize Studio:
4. Application Generation
We will now create an app with the current configuration of the TapNPass.
4.1 Configuration
4.1.1 Application Project
First, open the Mobile App view (IOTZExplorer -> IoTized Application -> Mobile App) and select Generated app in "App type". You will then see the Generated App Settings.
These settings are by default associated with the capabilities of your TapNPass. For this example, we will only set the location of the generated app:
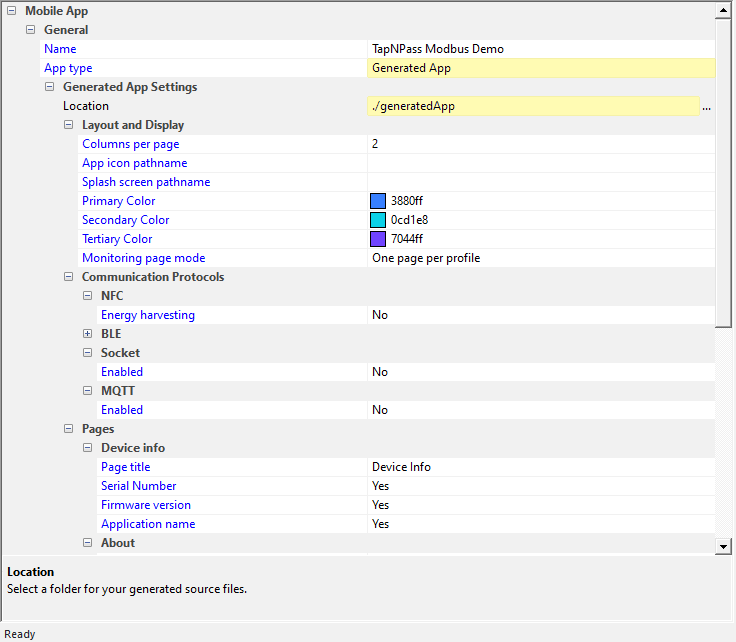
*The ./generatedApp is a path relative to the configuration project file (.iotz). The location may also be an absolute path, like C:\TapNPassDemo\app*.
4.1.2 Variables
Select a variable in the IOTZ Explorer. You will see a new set of options: Details for the generated App.
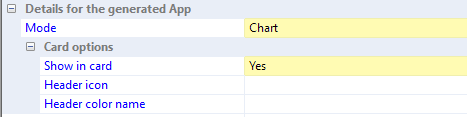
Here you can select the display mode of the variable. Here are the settings we will use for this demonstration:
| Variable | Mode | Show In Card | Options |
|---|---|---|---|
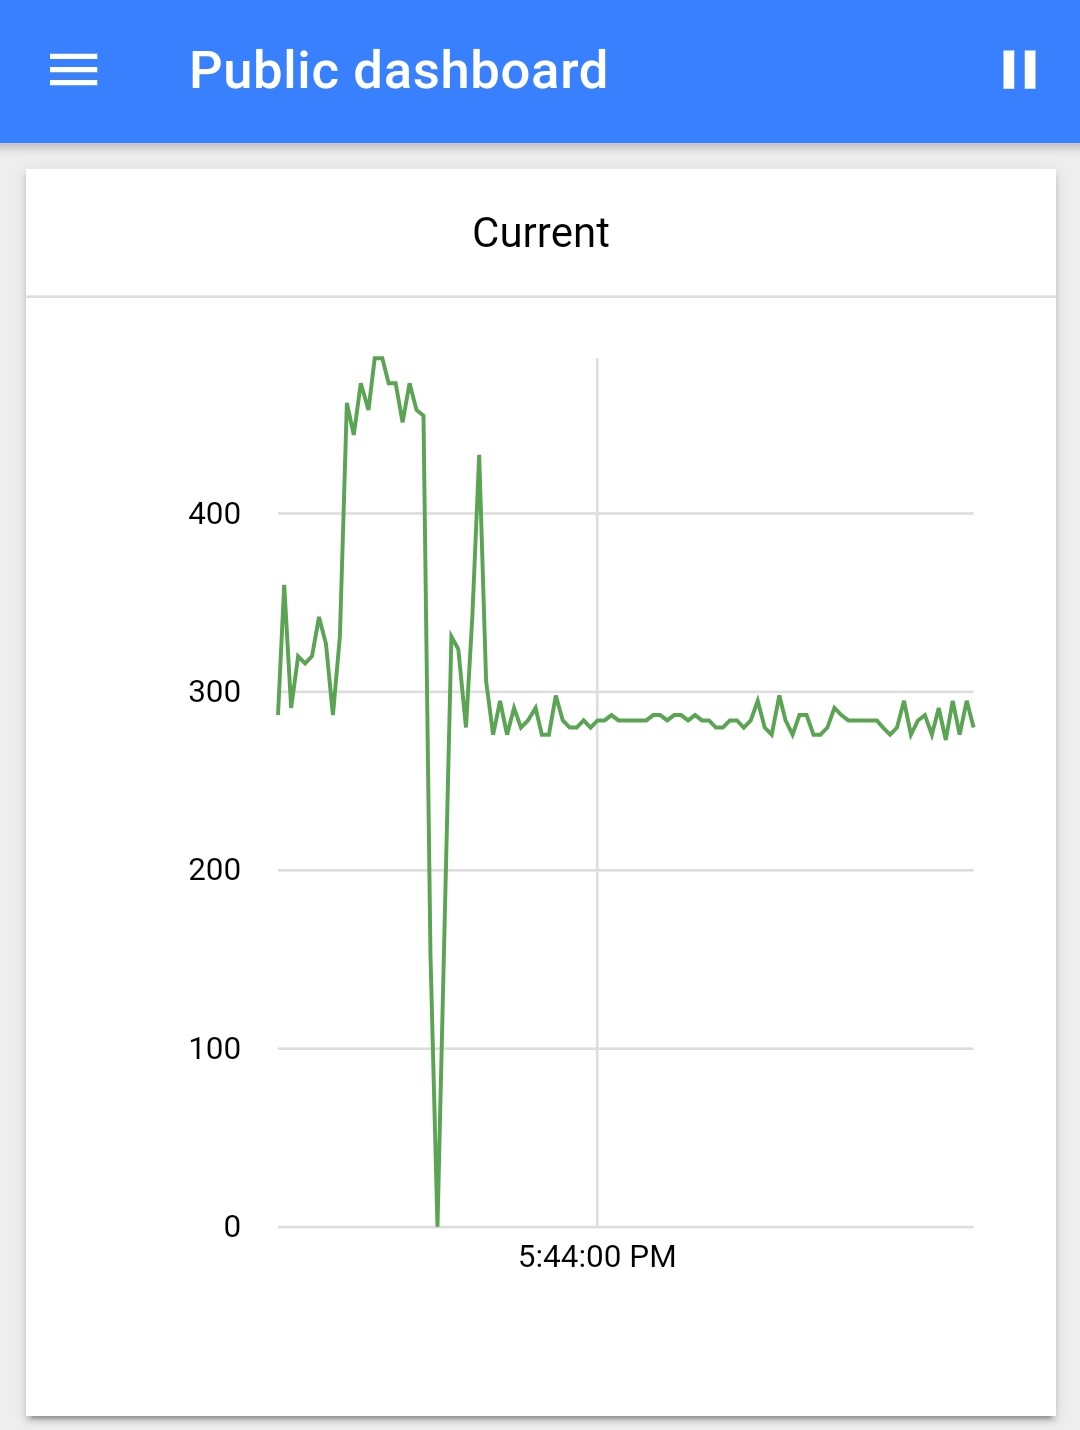
| Current | Chart | Yes | |
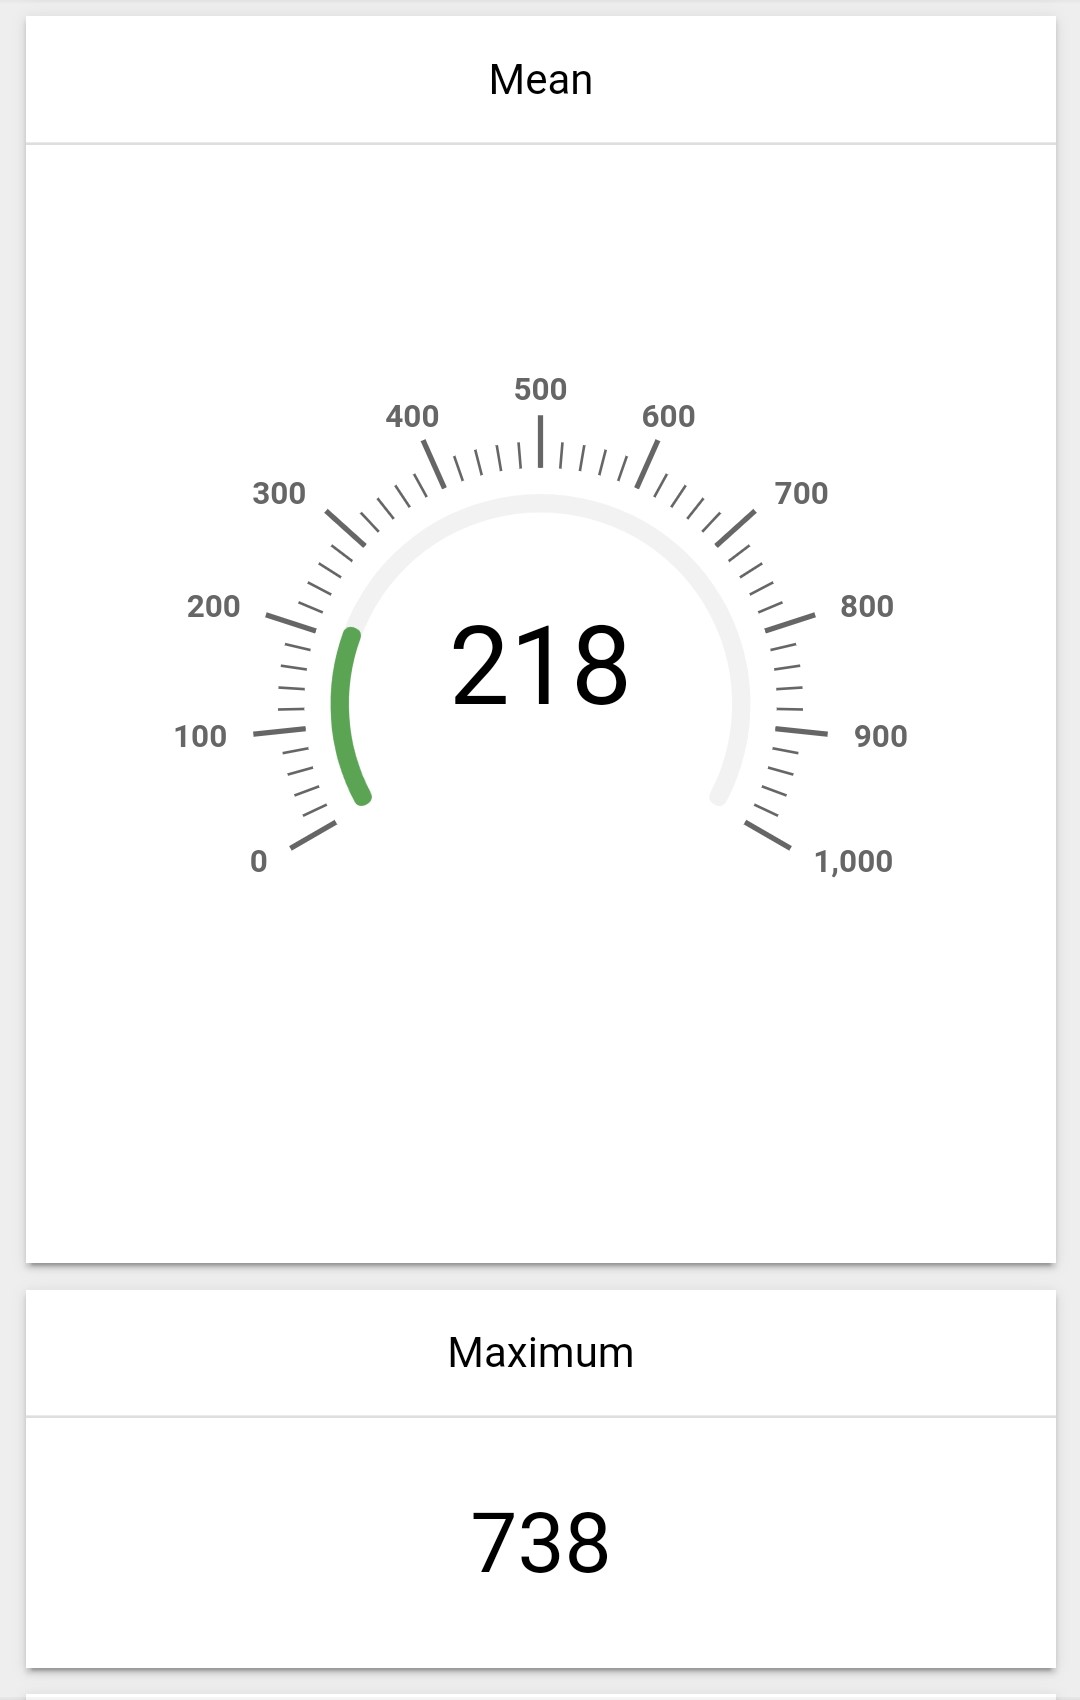
| Mean | Gauge | Yes | Min: 0, Max: 1000 |
| Maximum | Text | Yes | |
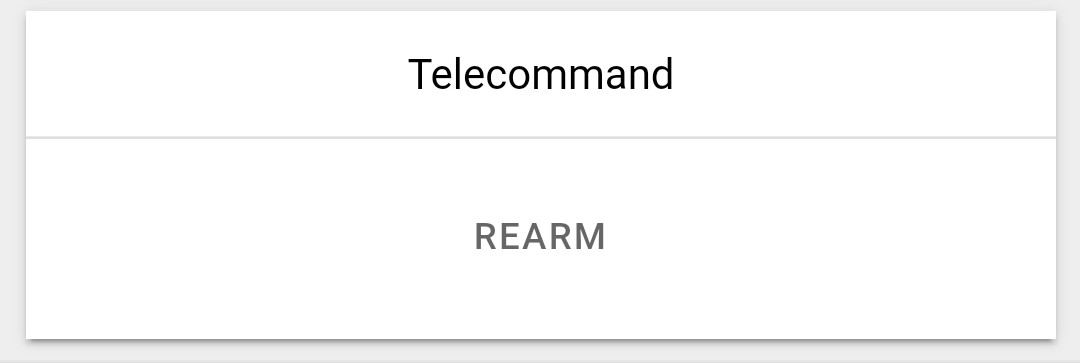
| Telecommands | Buttons | Yes | List of choice: 2=Rearm; |
Different modes have different specific options. See the App Generator documentation for more information on these parameters. You can also refer to the contextual help that appears on the bottom of the view, when an option is selected.
4.2 Project Generation
Now that the app settings are defined, click on Generate App. This will create the app project in the folder specified earlier in location. You can follow the progress of app generation in the Output window.
The first generation of the project may be slow as the App Generator will also download the project dependencies. Subsequent builds will get faster.
When the app is generated, you may now serve it, to display it in IoTize Studio and test it using the formerly configured TapNPass.
Click on Serve App. You will be asked if you want to display and test the generated app. Click yes, and wait for it to appear on the right side of IoTize Studio.
*To test the app using TapNPass, you will still need to click on Monitor.
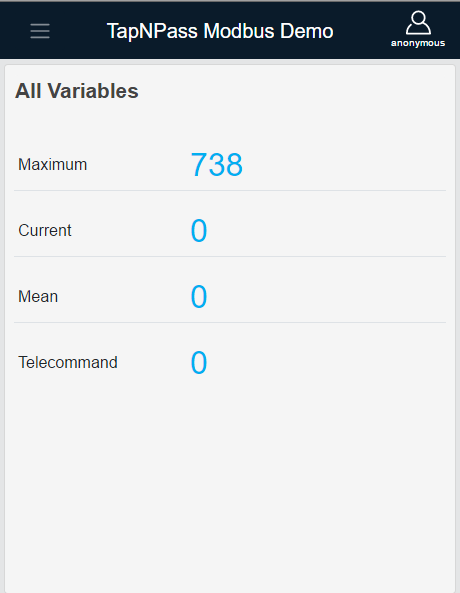
Here are the generated views, with the monitoring on:
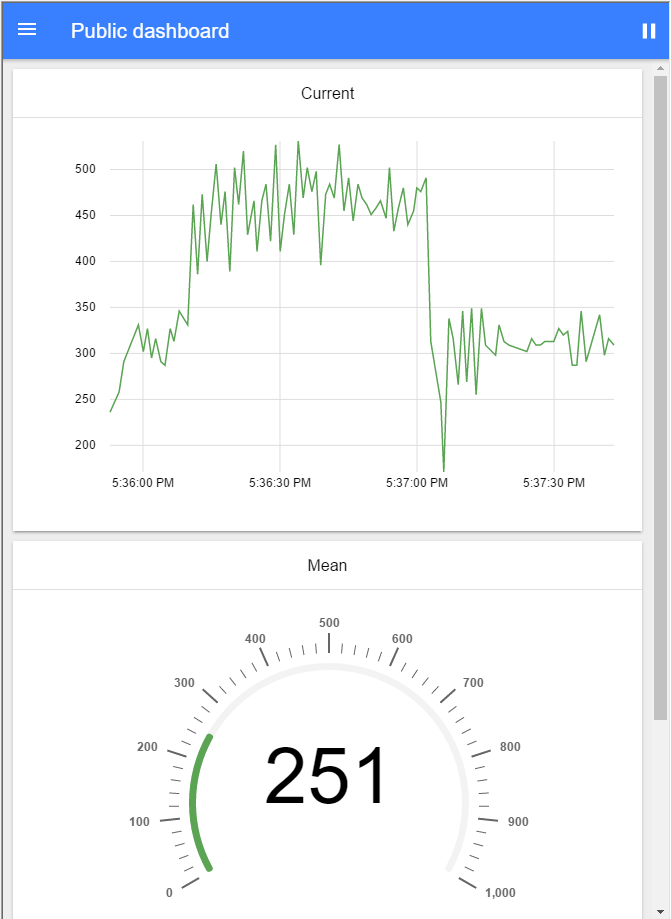
The Current variable is displayed as a line graph. The Mean variable is displayed as a gauge.
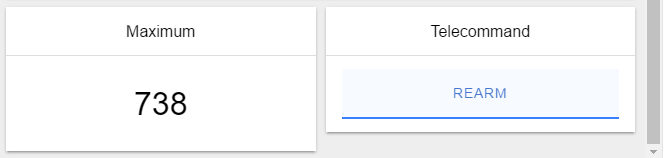
The Maximum variable is displayed as a raw value. The Telecommand variable is a Rearm button. When clicked, the value 2 is sent..
We will now build this project into a mobile application.
4.3 Mobile App
4.3.1 Requirements
The projects that we generate this way with IoTize Studio use Ionic and Apache Cordova to build cross-platform apps (Android/iOS) that run as native apps on the device. Therefore, you will need to install the following tools:
- Ionic
npm install --global @ionic/cli - Cordova
npm install --global cordova - Platform specific requirements documented by Cordova:
- Android requirements
- iOS requirements
- You will also need
native-run, a command tool used to automatically install and launch your application on your device.npm install --global native-run
4.3.2 Android
To run an IoTize generated app on an Android device, you will need a device set up for development. The following is a common way to do it, but you may have to check Android Documentation for more information.
- Enable USB debugging on the device: Open Settings, navigate to Developer options, and enable USB debugging. The Developer options menu may need to be enabled first. This is usually performed by clicking 7 times on the Build number, in About phone -> Software information
- Ensure the device has permission to connect to the computer. When USB Debugging is enabled on the device, an alert usually appears on the phone to give this permission on connecting to the computer. If such alert does not appear, you may use the command
adb devicesto launch the debugging service on your computer, and try to un plug and then plug in your phone again.
Once your device is set up for development, open a command prompt inside the project folder and run:
npm run android
To easily open a command prompt in your project folder on Windows 10, you may open it in the explorer and type cmd or powershell in the address bar to open the command prompt you want to use.
This command will create an APK (Android Package Kit), install it on your device and run it.
The first build may take some time to create the Android project. As with IoTize Studio, once the project is created, subsequent builds will get faster.
Your generated app will open on the connect page. Connect to your TapNPass: click on Bluetooth and search for your IoTize device, then select it. You may also approach your Android device to the TapNPass to use NFC for pairing.

Once connected, the app will diplay the Public dashboard that was displayed in IoTize Studio earlier:
The generated APK is located here:
<PROJECT_FOLDER>\android\app\build\outputs\apk\debug\app-debug.apk
You may share this file to install it on another Android device. In order to do so, send it to your phone (using USB transfer, mail, cloud service, or any other way) and open it with your phone's file explorer / mail / cloud app.
*You may have to allow the application you use to open the file to Install unknown apps. Android usually proposes opening the settings and toggling this option when you open the apk. If Android does not do this, you can find this option in Settings -> Apps, select the application and Advanced -> Install unknown apps*
To learn how to make a release version and publish it on the Play Store refer to the Ionic Documentation
4.3.3 iOS
In order to build an app for iOS, you need to use a MacOS computer, and have your app project on it. As IoTize Studio is not available on MacOS, you will need to copy your project folder from Windows to your Apple device.
node_modules and platforms folders contain lots of files that can be installed or built again from your Mac. It is usually better to NOT copy them when transferring your project folder. To reinstall node_modules, simply run npm install on a terminal in your folder.*
You can also generate the project from the .iotz file only, with the following command:
iotize-app-get start <PATH_TO_PROJECT_FOLDER> --tapConfig <PATH_TO_IOTZ_PROJECT_FILE>
This requires the IoTize App Generator be installed on your Mac. If iOS requirements are met, simply run:
npm run ios
You can refer to the documentation for further information on iOS app development.