Connecting the STM32 Nucleo board to your smartphone
Introduction
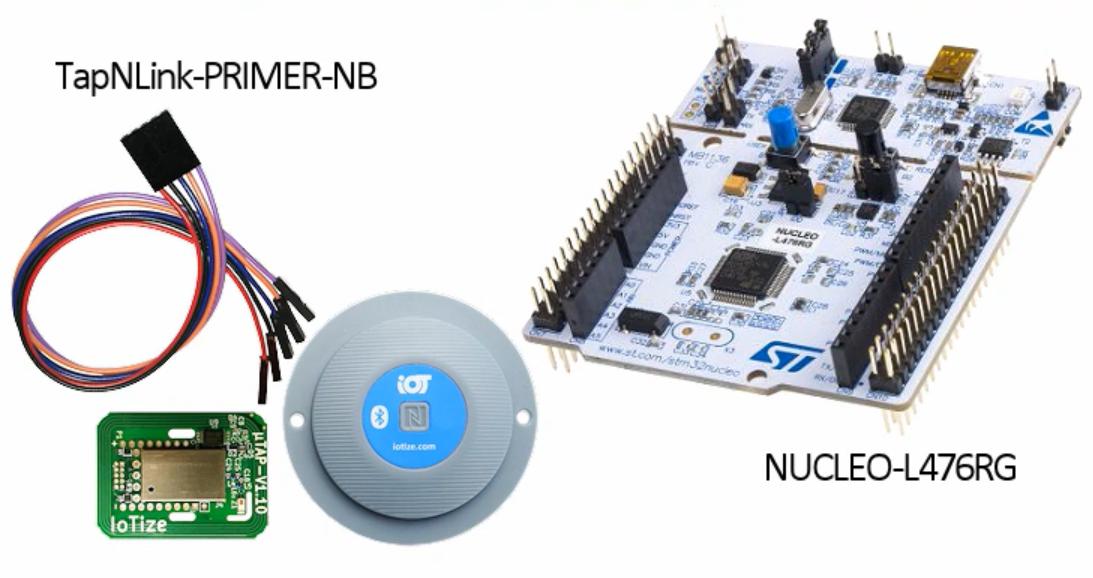
The STM32 Nucleo board allows developers to try out new ideas and quickly create prototypes with STM32 MCUs. STM32 Nucleo boards can easily be extended with wireless capabilities using a TapNLink module. In this tutorial we will program our Nucleo-L476RG with a project that uses an ADC peripheral to perform a single ADC conversion of the internal temperature sensor, then connects it to a TapNLink Primer to send the temperature data by BLE to a mobile phone.
Prerequisites
-
TapNLink Primer Evaluation Kit: Evaluation kit that allows iot designers to test all the advantages of IoTize TapNLink products for building a connected electronic system. You can purchase a TapNLink Primer Evaluation Kit from Digikey.
-
IoTize Studio: The PC-based configuration software that we use to configure TapNLink Primer. You can download and install the software from http://docs.iotize.com/Downloads.
-
NUCLEO-L476RG board: Affordable and flexible platform that eases prototyping using a STM32L476RG microcontroller. See additional information on ST website.
-
STM32CubeL4 MCU Firmware Package: A software platform for the STM32L4 series. You can find this package on GitHub. For this tutorial we will use the ADC_TemperatureSensor sample project.
-
STM32 Software Development tools: You will need an integrated development environment (IDE) with C compiler and debugger as well as the embedded software libraries required to configure and initialize the MCU with the project samples. In this tutorial we use Raisonance Tools that you can download and use for free (up to 64 KBytes of code) but you can use any other STM32 development toolchain to build and program the sample project.
-
'Tap Manager' app on a mobile phone: TapNLink companion App, helping configure Taps in developer mode. Tap Manager could also be used as the 'End User' monitoring App with TapNLinks. Tap Manager is available on Google Play for Android smartphones and App Store for iPhones.
Part1: Program NUCLEO-L476RG board with ADC_TemperatureSensor application
The first step is to build ADC_TemperatureSensor sample application and program the Nucleo board microcontroller with this program.
If you already know how to program your Nucleo board you can skip this step and go directly to step 2. You may use any programming tool for this purpose, but in this tutorial we use Ride7 and TapNLink Primer. Please note that to program TapNLink Primer you need a BLE enabled Windows 10 (version 1803 or above). If your PC does not have a BLE device integrated you can also use Ride7 with an ST-Link.
Step1: Build ADC_TemperatureSensor application
This sample project describes how to use an ADC peripheral to perform a single ADC conversion of the internal temperature sensor and to calculate the temperature in degrees Celsius.
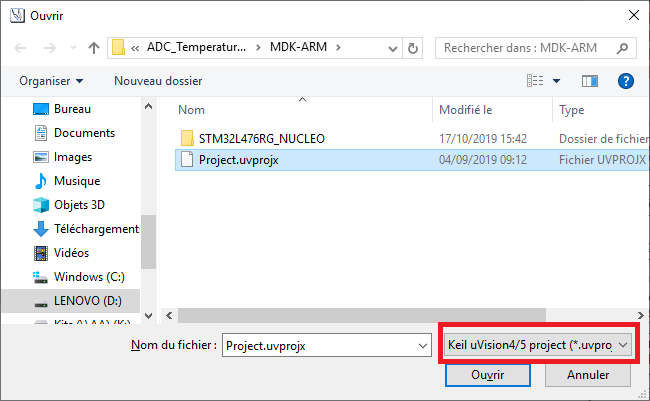
Launch Ride7 IDE, select Keil µVision project Filter from File|Open Project command, browse directories and open the Keil µVision project located in :
{STM32CubeL4 Directory}\Projects\NUCLEO-L476RG\Examples_LL\ADC\ADC_TemperatureSensor\MDK-ARM\Project.uvprojx
Ride7 automatically converts the uvprojx to an rprj and imports the corresponding settings. Use 'Project|Build Project' command to build the application.

Step2: Connect TapNLink Primer to NUCLEO-L476RG
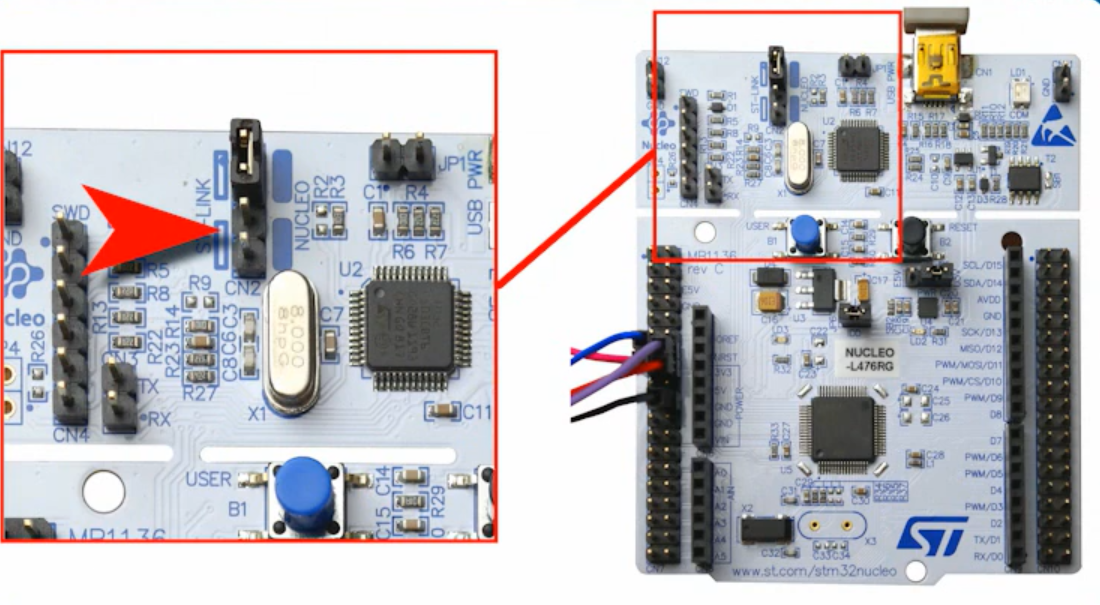
Disconnect the embedded ST-Link debugger and use the STM32 debug ports to connect the TapNLink module:
- Remove the SWDIO jumpers but leave the SWDCLK jumpers. Ensure your are using a USB charger to power the Nucleo board, as connecting the board to a PC will wake-up the ST-Link debugger and prevent TapNLink from accessing the SWD signals.
- Connect TapNLink to the pins on CN7:
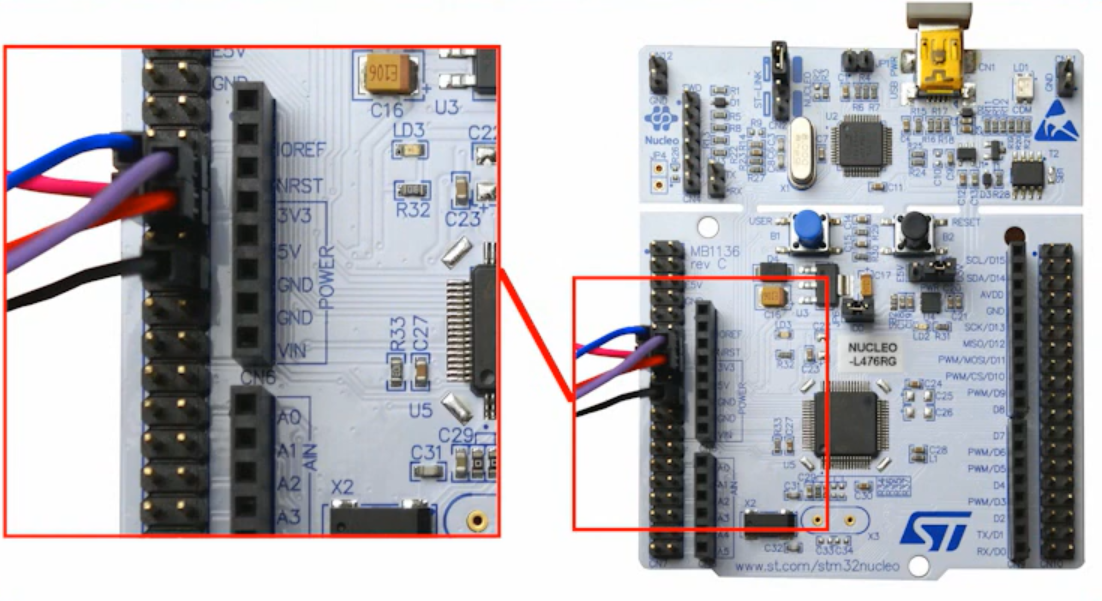
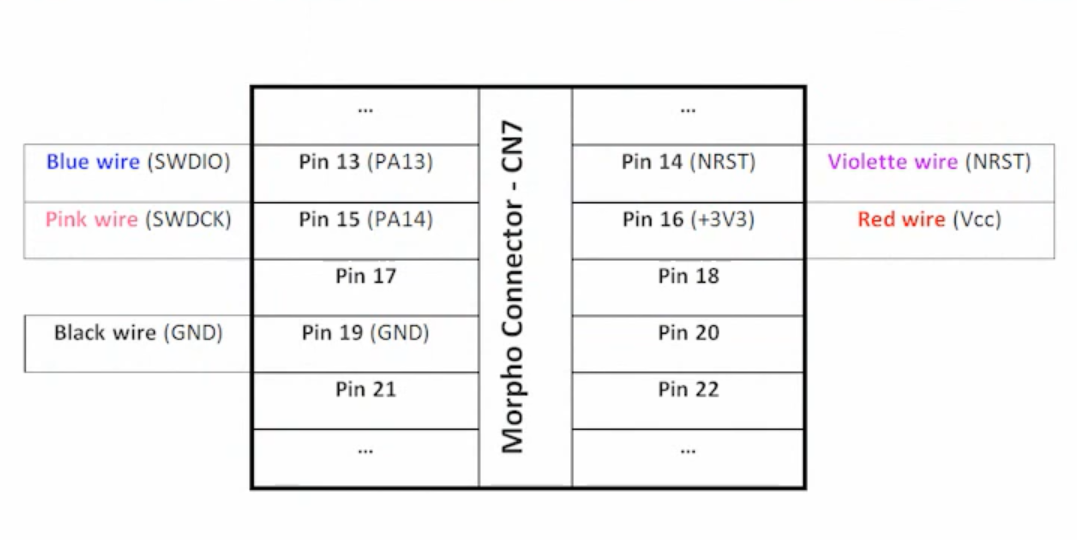
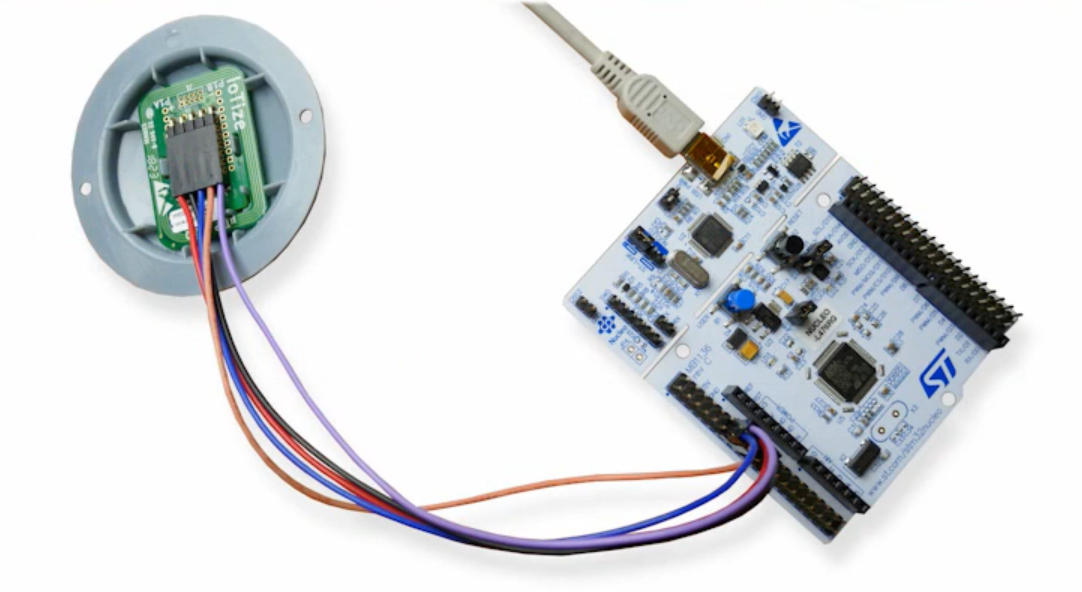
The resulting connected hardware:
Step3: Use TapNLink to program the Nucleo board
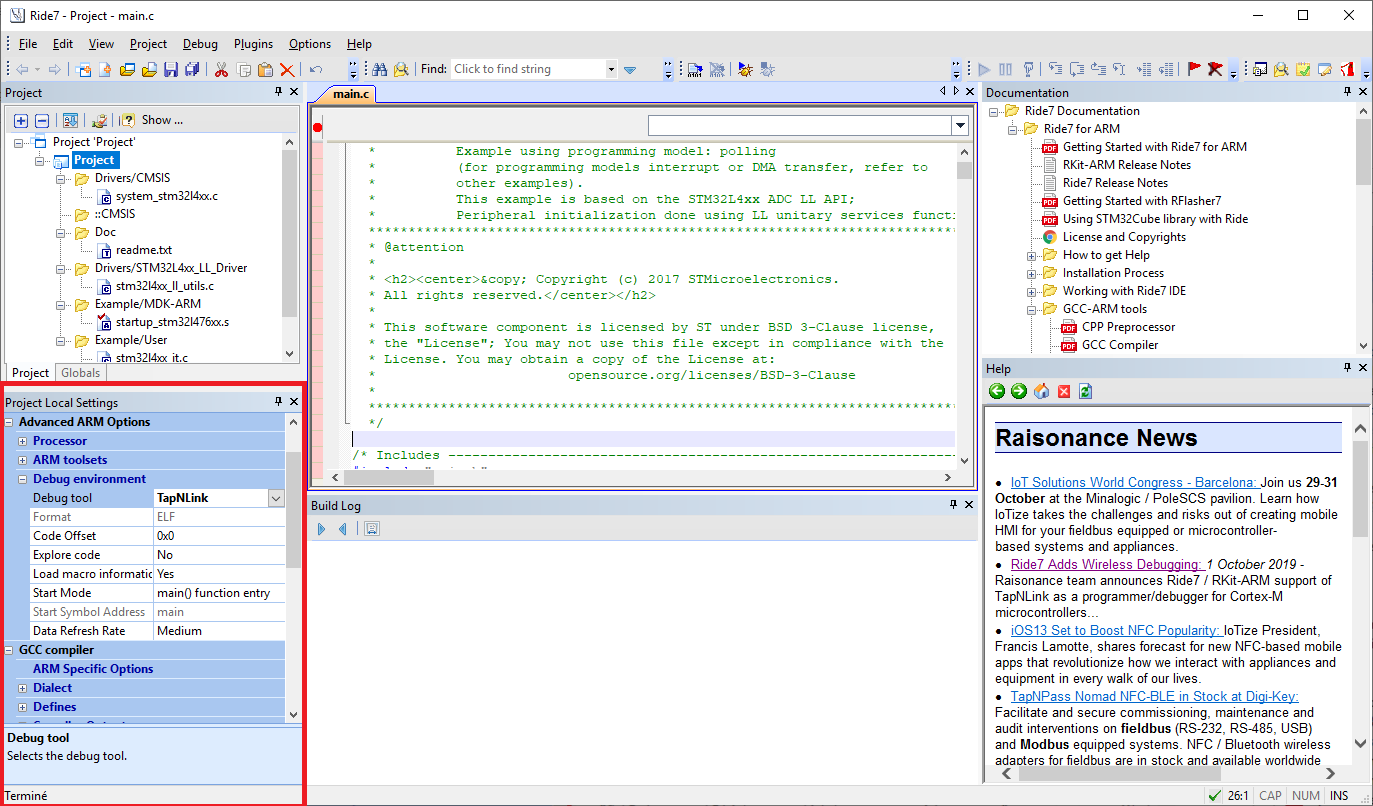
From the STM32_Sensor Local settings pane, select TapNLink as the application’s debugging tool. Then scroll down the settings pane to reach the RLink configuration| Advanced Options:
Click on 'Click here to open dialog box' button to configure TapNLink advanced options.
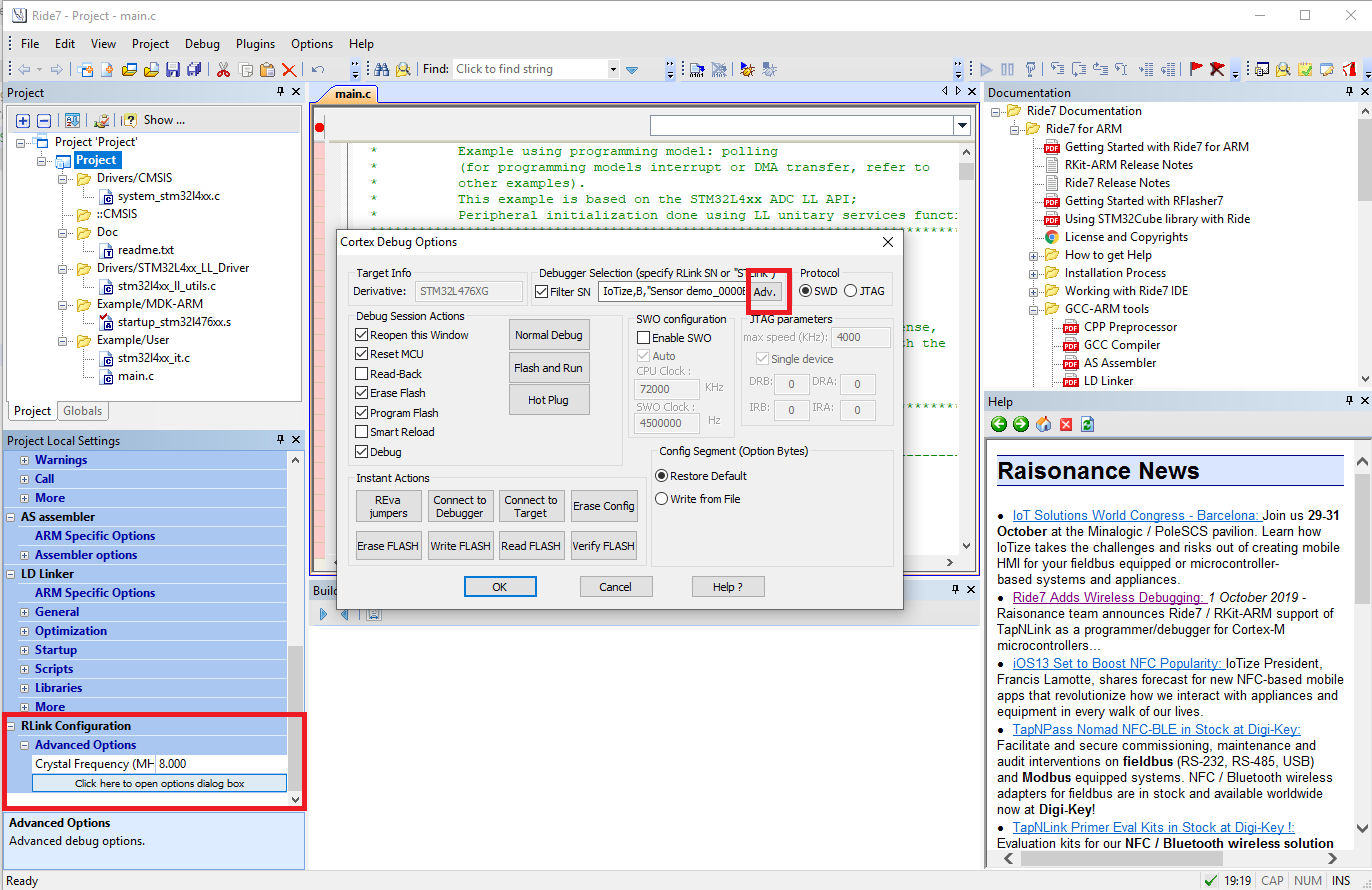
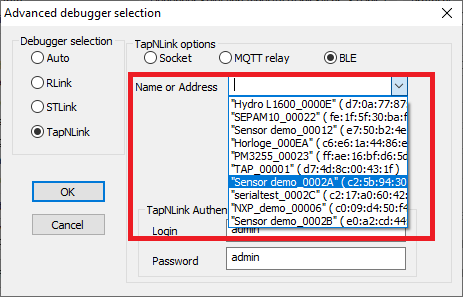
In the Advanced debugger selection dialog box, select TapNLink as the debugger tool, and BLE for the communication protocol. If you don’t know the advertized name of your TapNLink Primer device, you can click the button beside the Name or Address text field: Ride7 will scan and display the available devices, so you can find and select yours.
TapNLink connection to the target is protected with a User\Profile permission system. TapNLink Primers come with a default configuration, and Ride7 uses the default administrator login to access the target application.
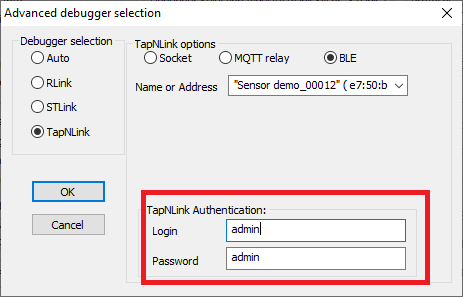
Select Ok to close the dialog box. You are now ready to start programming NUCELO board microcontroller and start debugging the ADC_TemperatureSensor application. Select Debug|Start command from the command bar and press ok to close the Cortex Debug Options dialog box.
Ride7 will program the Nucleo board using a BLE connection with your PC. You can monitor and debug the programmed application using Ride7 debugger.
Part2: Configure TapNLink to send ADC_TemperatureSensor variables by BLE
In this part we configure TapNLink to read the temperature value calculated in ADC_TemperatureSensor application and send it to a smartphone.
Step1: Create an ADC_TemperatureSensor configuration for TapNLink
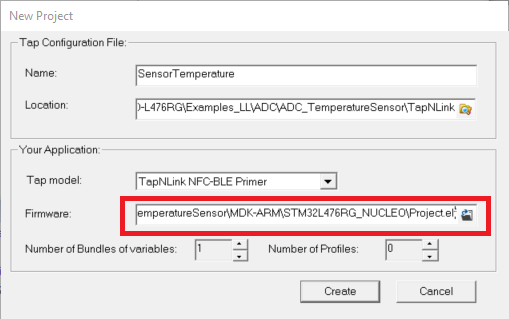
Launch IoTize Studio and create a new .iotz project located in ADC_TemperatureSensor directoy:
{STM32CubeL4 Directory}\Projects\NUCLEO-L476RG\Examples_LL\ADC\ADC_TemperatureSensor\MDK-ARM\STM32L476RG_NUCLEO\Project.elf
Use the Firmware field in the New Project dialog box to browse for the generated application so that IoTize Studio can load the debug symbols directly from the elf file.
Step2: Select variables to be read from ADC_TemperatureSensor application
IoTize Studio generates a default configuration file with a single Main Bundle and loads the Project.elf application debug symbols as displayed in the Resource View.
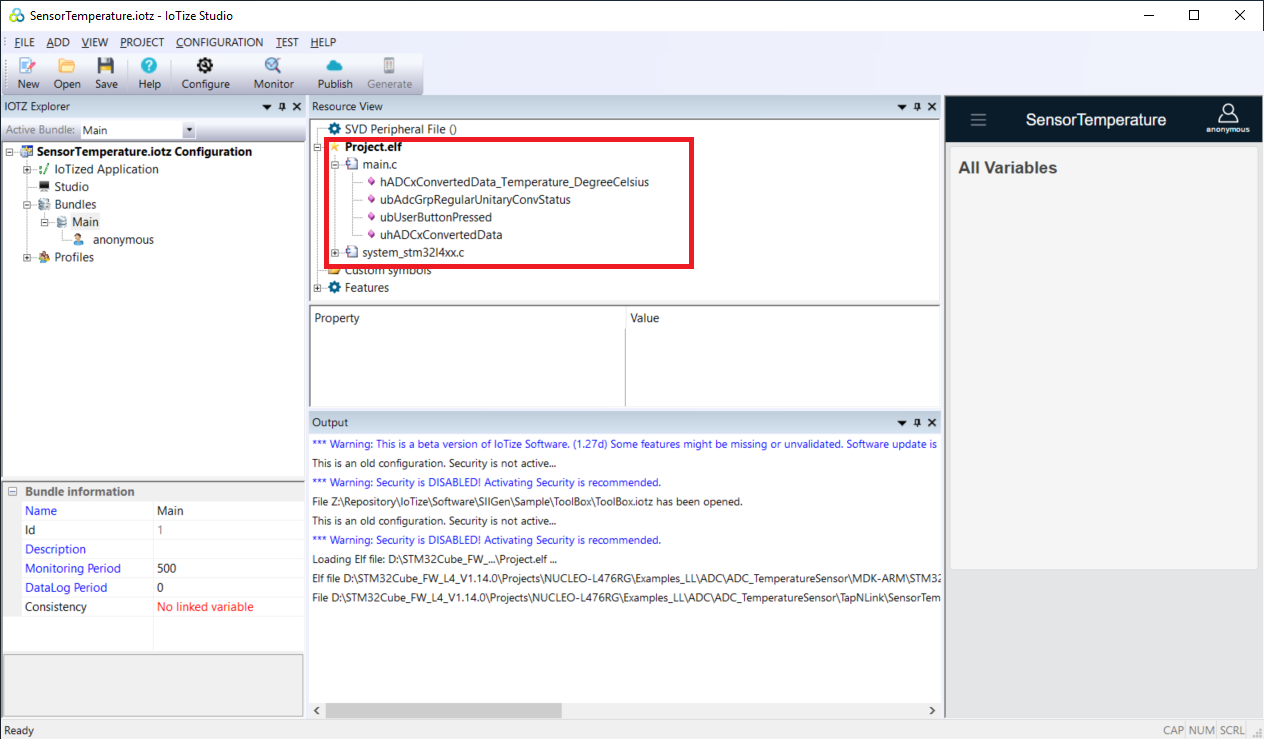
We will configure TapNLink to handle two variables:
- ubUserButtonPressed that enables reading and converting the internal temperature sensor value of the microcontroller.
- hADCxConvertedData_Temperature_DegreeCelsius that represents the measured temperature in degrees Celsius.
Select the variable name from the Resource View, drag and drop the variable to the Main Bundle in the IOTZ Explorer.
Select each variable to setup the way the variable is handled by TapNLink:
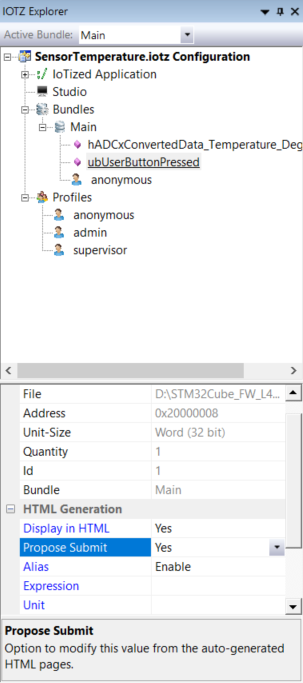
- ubUserButtonPressed: Rename the variable to 'Enable'(Alias) ,and select Propose Submit to yes in order to be able to modify this value from the generated UI.
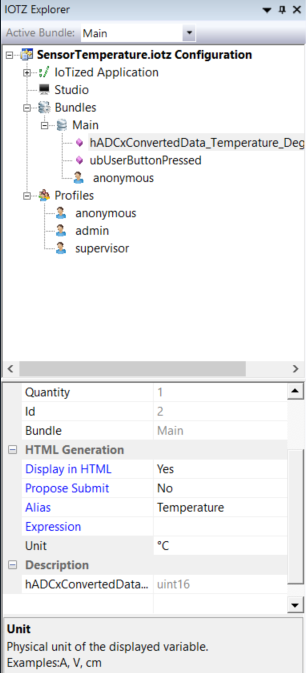
- hADCxConvertedData_Temperature_DegreeCelsius: Rename the variable to 'Temperature'(Alias) ,and set the Unit to '°C'.
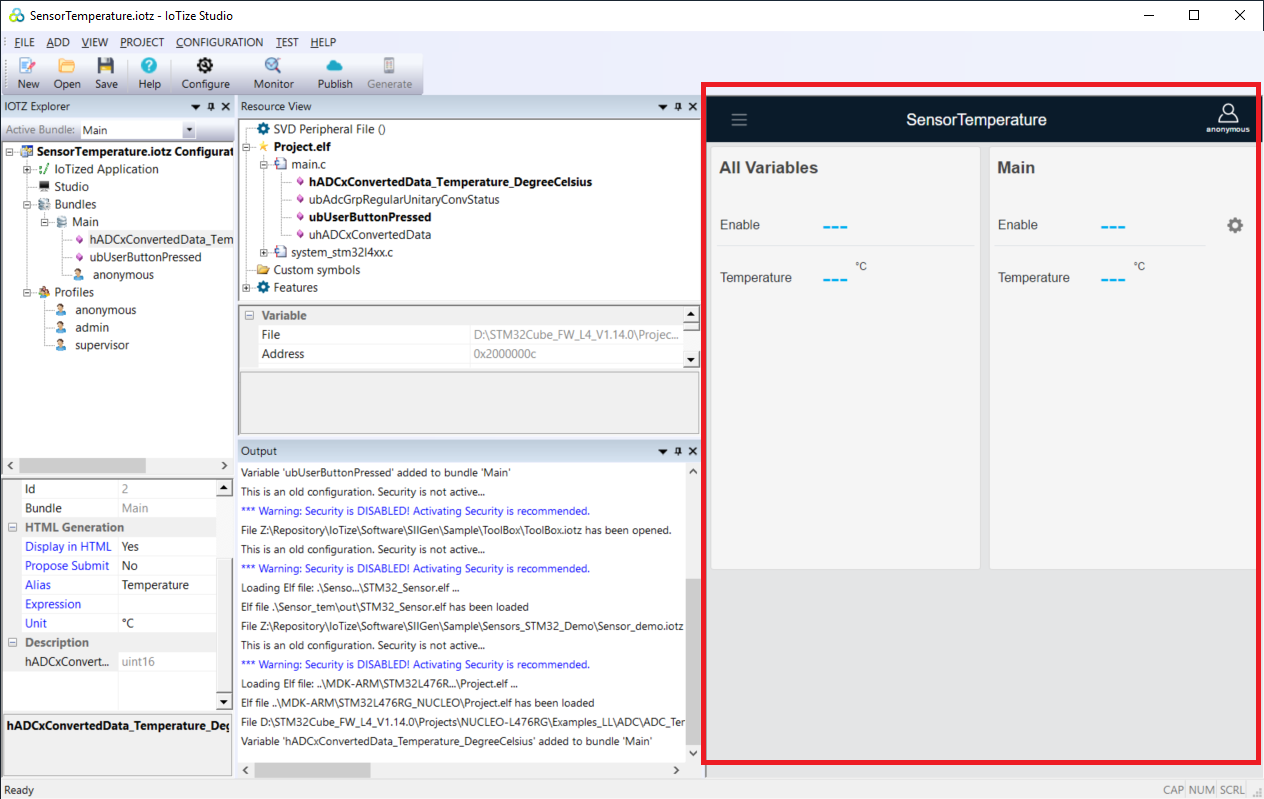
IoTize Studio automatically generates and displays an HTML based UI for our mobile App.
Step3: Transfer configuration to TapNLink
In order to keep this guide simple, we will not detail other TapNLink configuration settings. Refer to the User Manuals to learn more about TapNLink technologies and configuration.
To configure TapNLink with our settings, we will use IoTize Studio and a BLE connection between the PC and TapNLink. If your PC is not BLE enabled, there are other choices, refer to IoTize Studio Manual to learn more.
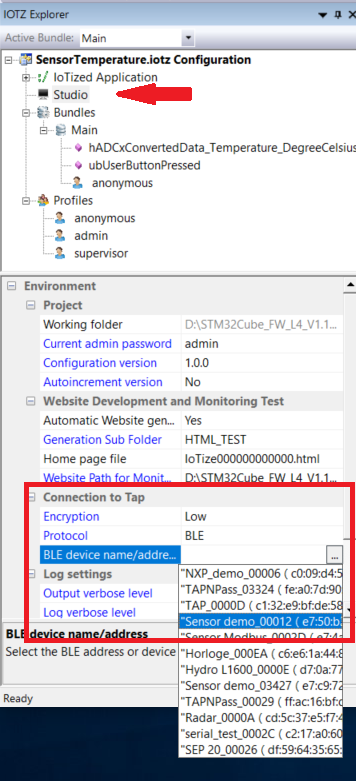
- Select Studio and in the Setting pane select the BLE protocol and click on '...' button to display the list of BLE TapNLinks in order to select your TapNLink Primer as follows:
- Select TEST|Test connection command to verify the connection between Studio and TapNLink. Upon a successfull connection to TapNLink, Studio will read the Serial Number of your TapNLink and display the following messagebox:
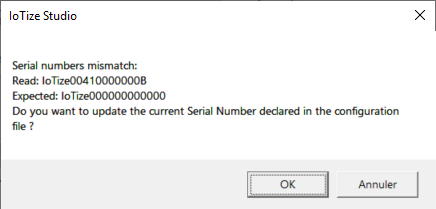
Click Ok to modify the settings according to your specific TapNLink.
-
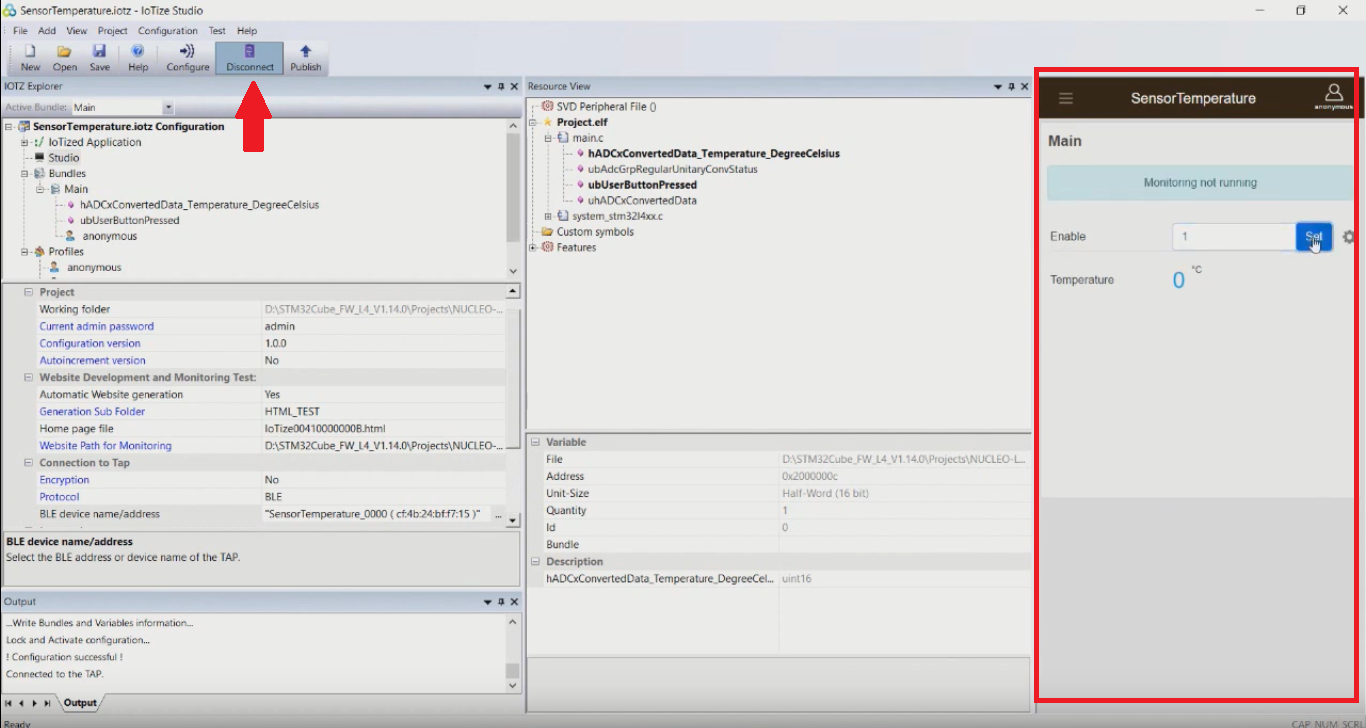
Select CONFIGURATION|Write to Tap command to transfer the configuration to TapNLink.
-
Select TEST|Monitor command to verify the configuration of TapNLink. Modify the enable button value to set the the value to 1. This will enable reading the sensor value and display the value of the measured temperation on our display.
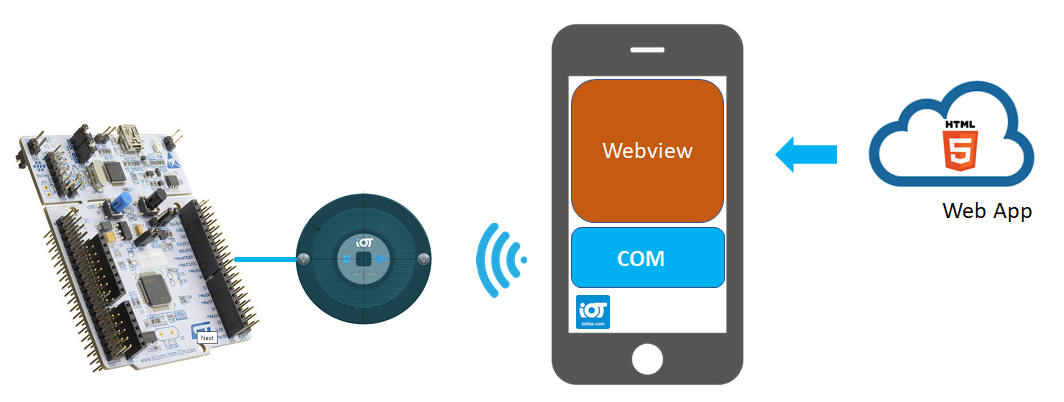
Part3: Monitor the Nucleo board from a smartphone
Once TapNLink is configured to handle ADC_TemperatureSensor variables and send them by BLE, we are ready to use the auto-generated web pages to monitor the application from a smartphone.
Step1: Upload the generated HTML pages to 'IoTize Primer Cloud Services'
We will upload the auto-generated web pages to 'IoTize Primer Cloud Services' and use Tap Manager app to connect to TapNLink by BLE from a mobile phone. IoTize provides a free website hosting service 'IoTize Primer Cloud Services' that comes with your TapNLink Primer and is handy for your testing and prototyping with TapNLink.
To upload the generated pages to 'IoTize Primer Cloud Services' select PROJECT|Publish command.
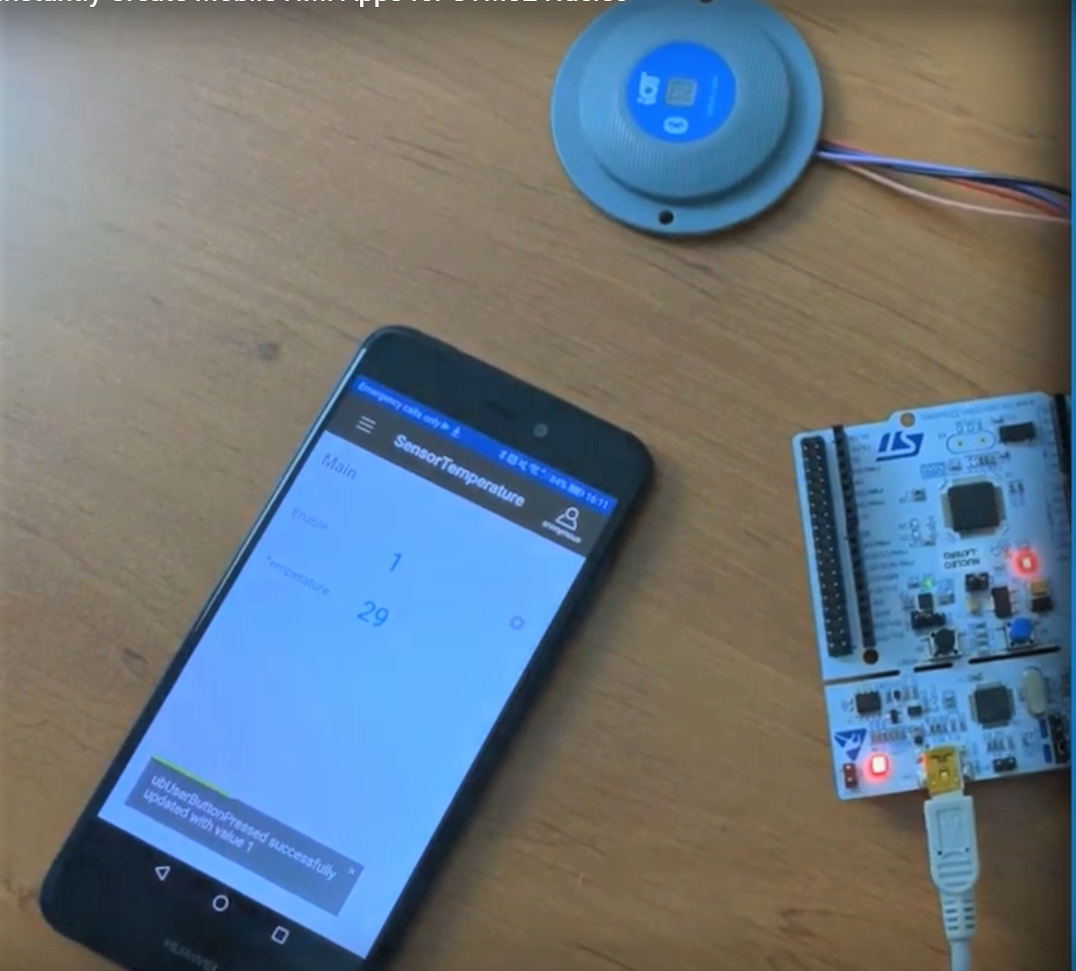
Step2: Connect to TapNLink by BLE and monitor the Nucleo board from a smartphone
If your Android or iOS smartphone is NFC enabled you can launch Tap Manager and connect to your TapNLink with a single NFC tap. Otherwise, launch Tap Manager and select the TapNLink device from the list of available BLE devices.
Tap Manager will automatically display the web pages from the Cloud and start the communication session with the Nucleo board.
To go further
- There is a video version of this tutorial on IoTize website.
- Refer to Raisonance documentation to learn more about Raisonance’s ARM toolset and features.
- To learn more about IoTize TapNLink products, refer to IoTize documentation center.