How to connect your device to IBM Watson Cloud Platform using TapNLink IoTize Primer
Introduction
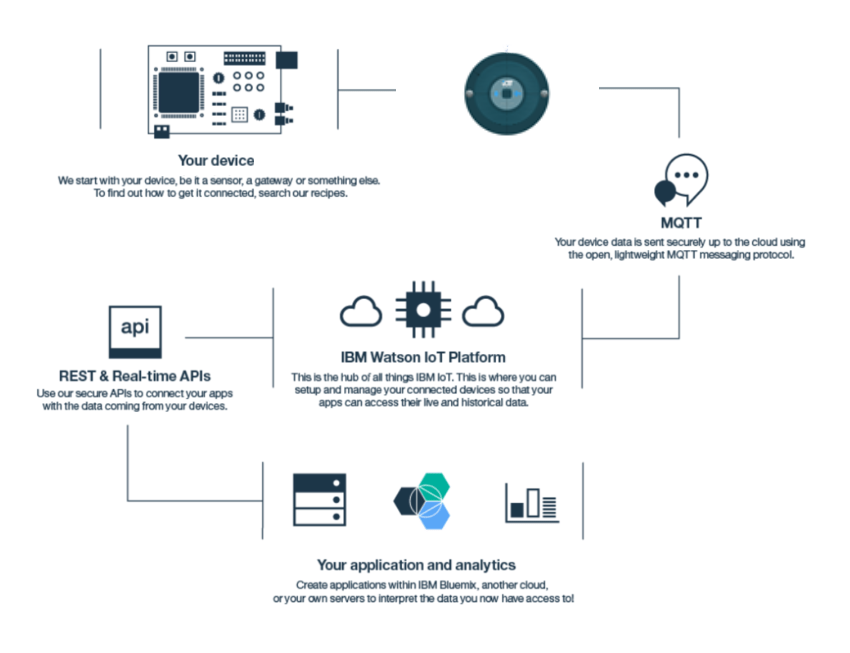
IoT platforms provide many integrated services and infrastructures like data storage, connectivity, display, control etc. Hence, they reduce the amount of investment required to deploy IoT solutions and this is one of the main reasons behind some of the most successful IoT solutions around. IBM Watson IoT platform is an industry grade IoT platform frequently used by big industries to store and analyze the data gathered from IoT devices.
TapNLink could be used as a facilitator for connecting your device to IBM Watson IoT Platform. In this tutorial we will setup an IBM Watson account, connect a TapNLink and connect IoTize Studio to it.
Prerequisites
-
TapNLink Primer WiFi Evaluation Kit: this kit allows IoT designers to evaluate all the advantages of IoTize TapNLink products for building a connected electronic system. You can purchase a TapNLink Primer Evaluation Kit from Digikey.
-
IoTize Studio: the PC-based configuration software that configures the TapNLink Primer to communicate with IBM Watson IoT Platform. You can download and install the software from IoTize website.
Step1: Setup your IBM Watson IoT Platform account
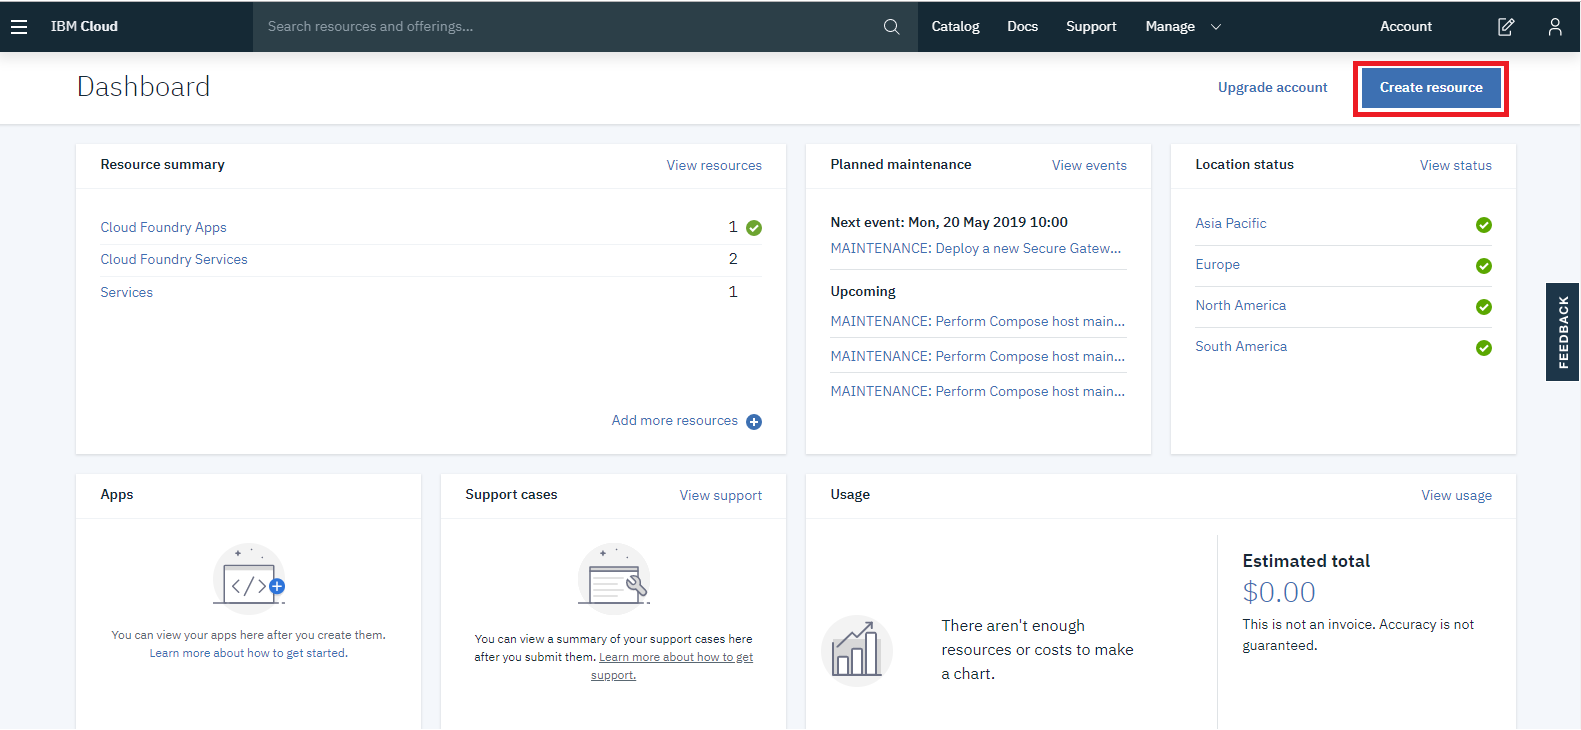
The first step is to create an IBM Cloud account: https://cloud.ibm.com/.
Then create an IBM Watson IoT Platform, by going to "Create resource" on the IBM Cloud Dashboard and selecting the Internet of Things platform.
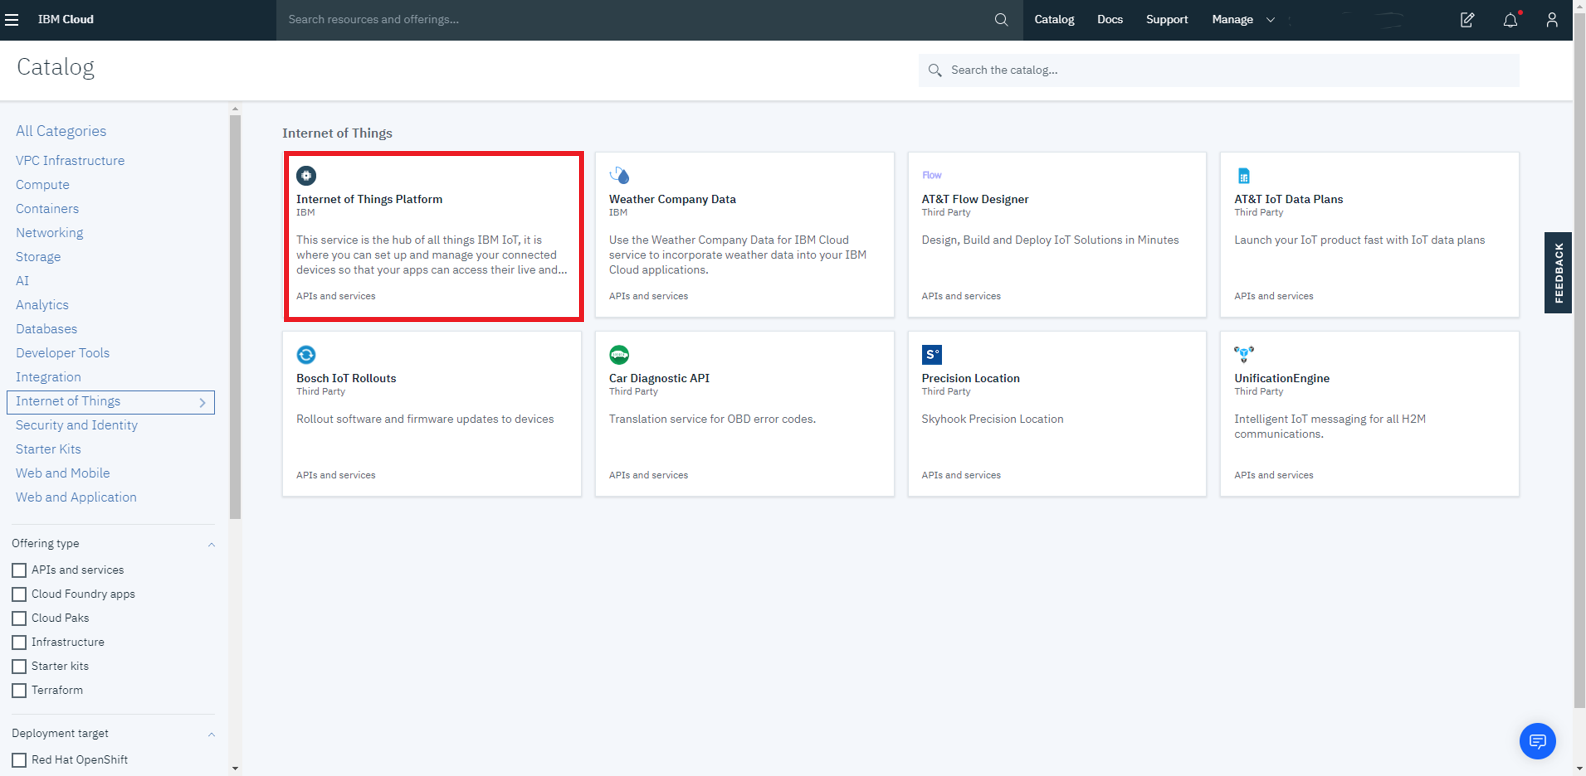
- Once you have created the IoT resource, you can launch the IBM Watson IoT Platform:

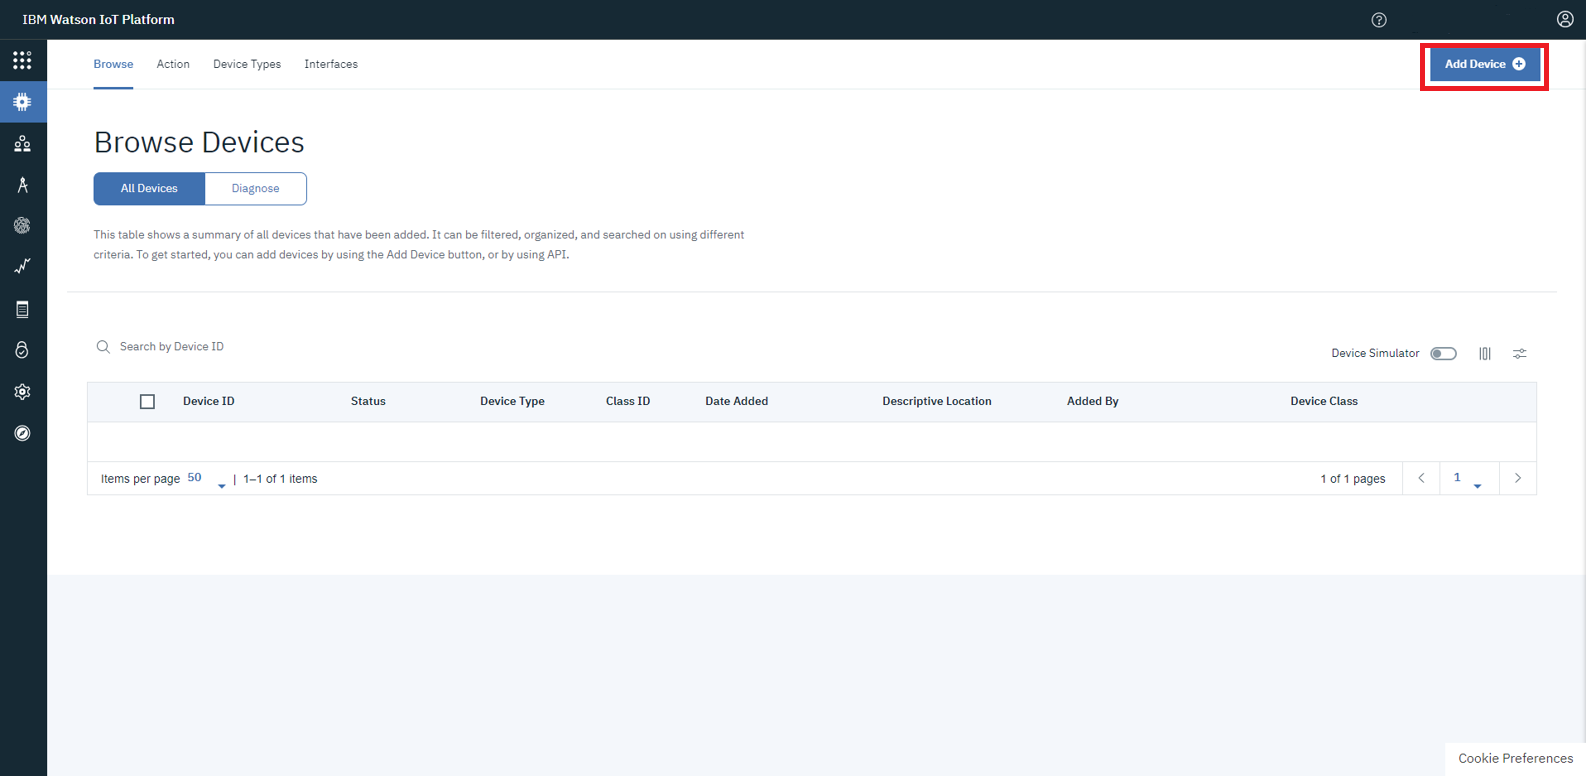
Step2: Register your device on your IoT Platform
In this step we will create a device twin in Watson IoT Platform service that represents your physical device.
Watson IoT Platform service includes a device twin feature. This cloud-based digital representation of your device is connected to Watson IoT Platform service. Once it is defined and instantiated, the device twin provides a consistent means of interacting with your device from the IoT hub.
- Within your IBM Watson IoT Platform, select Devices tab and click on Add Device button.
- Fill in the device details, the DeviceID will be a unique identifier for your device. You can use the DeviceType to group your devices.
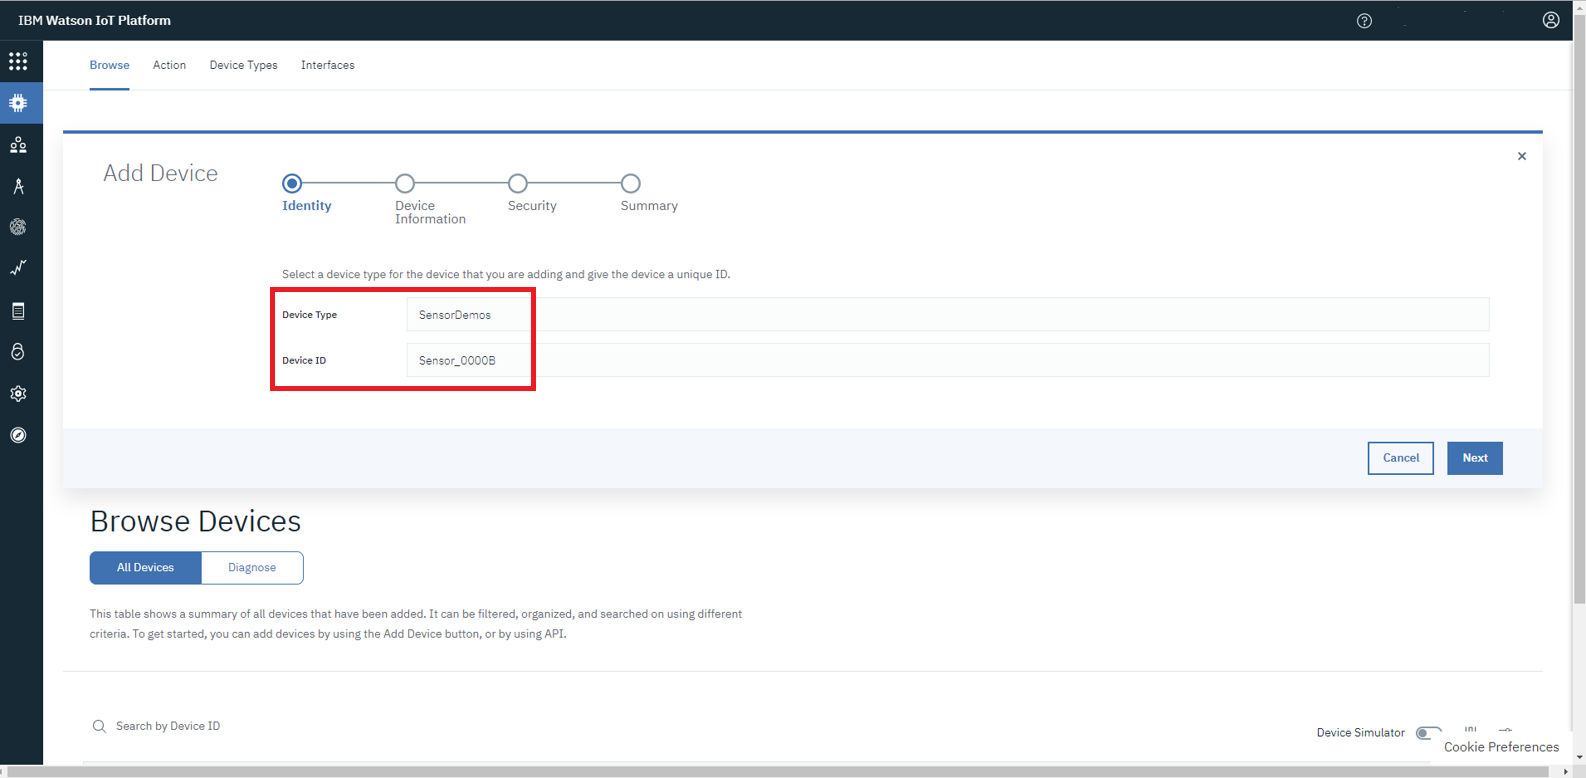
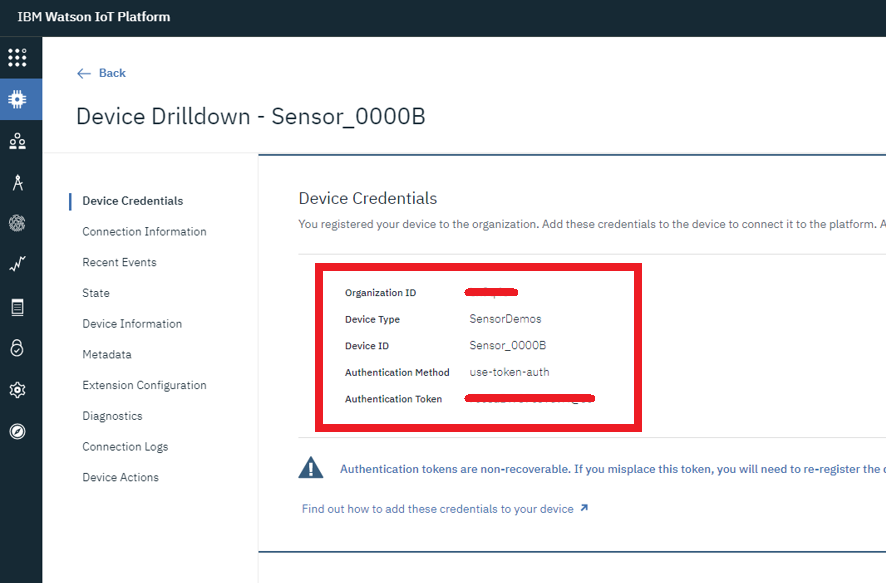
- You may provide additional information about your device but it is not mandatory. Select the security tab to set up your device authentication token. You can either choose an auto-generate token or provide your own authentication token. It is very important that you keep a note of your token when it appears on the summary screen, as when you proceed past the summary stage, the token will not appear again. You will need to provide the information displayed on the summary page when configuring your TapNLink to communicate with Watson IoT Platform.
Step3: Configure TapNLink to handle IBM Watson Connectivity
The STM32 Blue Pill board that is included in the TapNLink Primer Evaluation Kit is pre-programmed with the STM32_Sensor application which demonstrates a few simple features like blinking the LED, measuring the internal temperature and voltage etc. In this guide, we will configure TapNLink to send some information to Watson IoT Platform.
Launch IoTize Studio and open sensor_demo.iotz config file installed in the Sensors_STM32_Demo subdirectory of the installed examples.
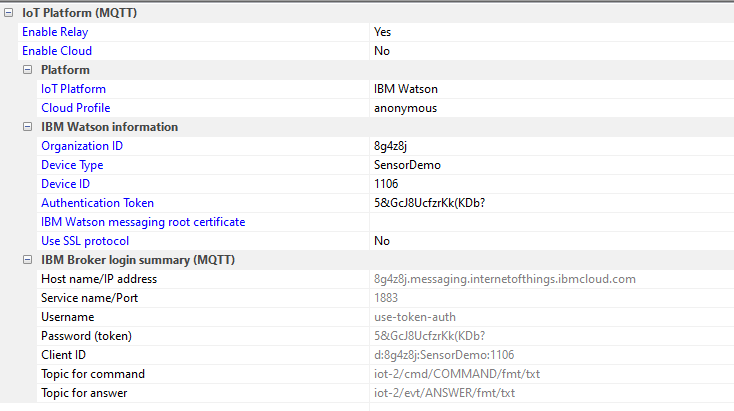
Select IoT Platform (MQTT) and setup the configuration:
- Set Enable Relay to Yes.This allows the tap to use MQTT to receive LWM2M commands
- Select IBM Watson in IoT Platform
- Cloud Profile: A specific profile to control access privileges of the connected 'IoT Platform'.
-
IBM Watson information: Provide the previously created Device Twin information to enable TapNLink to connect directly to your Watson IoT Platform.
-
Organization ID
- Device Type
- Device ID
- Authentication Token
- IBM Watson messaging root certificate: If you set up a Root CA to aunthenticate your devices, set it here. Leave it empty otherwise
-
Use SSL protocol
-
IBM Broker login summary (MQTT): This shows the actual MQTT connection information that will be used by the Tap. These are created from the IBM Watson information. It also shows the topics used to receive commands and send answers.
Step4: Setup the WiFi Settings and Configure TapNLink
Set Incoming communication (Wireless) | WiFi:
- Network mode to 'Network(Station)'
- SSID to your WiFi network
- WEP key to your WiFi network's security key,
Click on the "Configure" button to re-configure TapNLink, then use Test|Reboot Tap to restart TapNLink. Now TapNLink will dynamically connect to your IBM Watson IoT Platform and wait for any incoming LWM2M request.
Step5: Connect IoTize Studio to IBM Watson
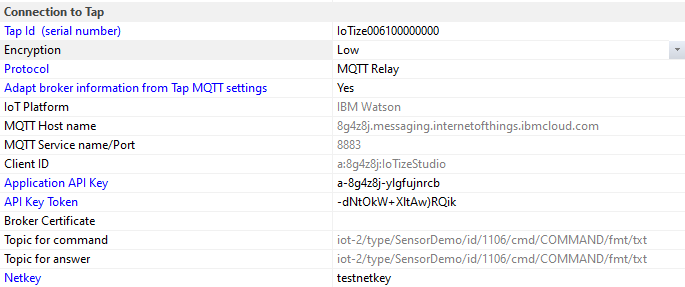
In order to connect IoTize Studio to IBM Watson, we need to create an application API Key. We only need to create it once: the API Key will be able to communicate with every device you registered in your IBM Watson cloud service.
- In the Platform Service dashboard, go to Apps > API Keys.
- Click on Generate API Key. You will then see the API Key and its token. It is very important that you keep a note of your token when it appears on the summary screen, as when you proceed past the summary stage, the token will not appear again.
- Click on Finish.
Now, go to Studio | Connection to Tap in IoTize Studio:
- Set Protocol to MQTT Relay
- Set Adapt broker information from Tap MQTT settings to Yes.
- Set Application API Key and API Key Token to the one you created on your IBM Watson dashboard.
Click on Monitor. IoTize Studio will connect to the MQTT Broker, and communicate with the Tap. You are now able to communicate with your Tap through your IBM Watson MQTT broker.
To go further
- To learn more about IoTize TapNLink products, refer to IoTize documentation center.
- To learn more about IBM Watson IoT platform, refer to IBM Knowledge Center.